What is Apache Airflow?

Apache Airflow is an open-source platform used to programmatically orchestrate, schedule, and monitor workflows. It allows users to define, manage, and execute complex workflows as directed acyclic graphs (DAGs) of tasks. Each task in the DAG represents an individual step in the workflow, and Airflow takes care of scheduling and executing these tasks, making it easier to automate data pipelines, ETL (Extract, Transform, Load) processes, and other data workflows.
Top 10 use cases of Apache Airflow:
- Data ETL: Automate the extraction, transformation, and loading of data from various sources into a data warehouse or storage system.
- Data Processing: Schedule and manage data processing tasks, such as data cleansing, aggregation, and enrichment.
- Data Migration: Coordinate the migration of data between different systems or cloud providers.
- Model Training: Schedule and monitor the training of machine learning models on large datasets.
- Reporting and Analytics: Automate the generation and delivery of reports and analytics dashboards.
- Workflow Automation: Orchestrate and automate business processes that involve multiple steps and dependencies.
- Infrastructure Management: Manage and schedule tasks for deploying, scaling, and managing cloud infrastructure.
- DevOps Automation: Automate CI/CD (Continuous Integration/Continuous Deployment) pipelines and other DevOps tasks.
- IoT Data Processing: Process and analyze data streams from Internet of Things (IoT) devices.
- Workflow Monitoring: Monitor the progress and status of workflows and receive alerts for any failures or issues.
What are the feature of Apache Airflow?
- DAGs-as-Code: Define workflows as Python scripts, making it easy to version control and manage code changes.
- Dynamic Workflow Generation: Create dynamic workflows that adapt to changing data or conditions.
- Scheduling: Set up flexible schedules for executing tasks at specific intervals or based on events.
- Parallelism: Execute tasks in parallel, taking advantage of distributed computing capabilities.
- Extensible: Airflow supports custom operators, sensors, and hooks to integrate with various systems and services.
- Task Dependencies: Define dependencies between tasks to ensure correct execution order.
- Backfilling and Catchup: Rerun or backfill historical data to keep the workflow up to date.
- Monitoring and Logging: Airflow provides a web-based UI to monitor workflows and view logs.
- Alerting: Receive alerts and notifications when workflows encounter failures or issues.
- Security and Access Control: Integrate with authentication systems to control user access and permissions.
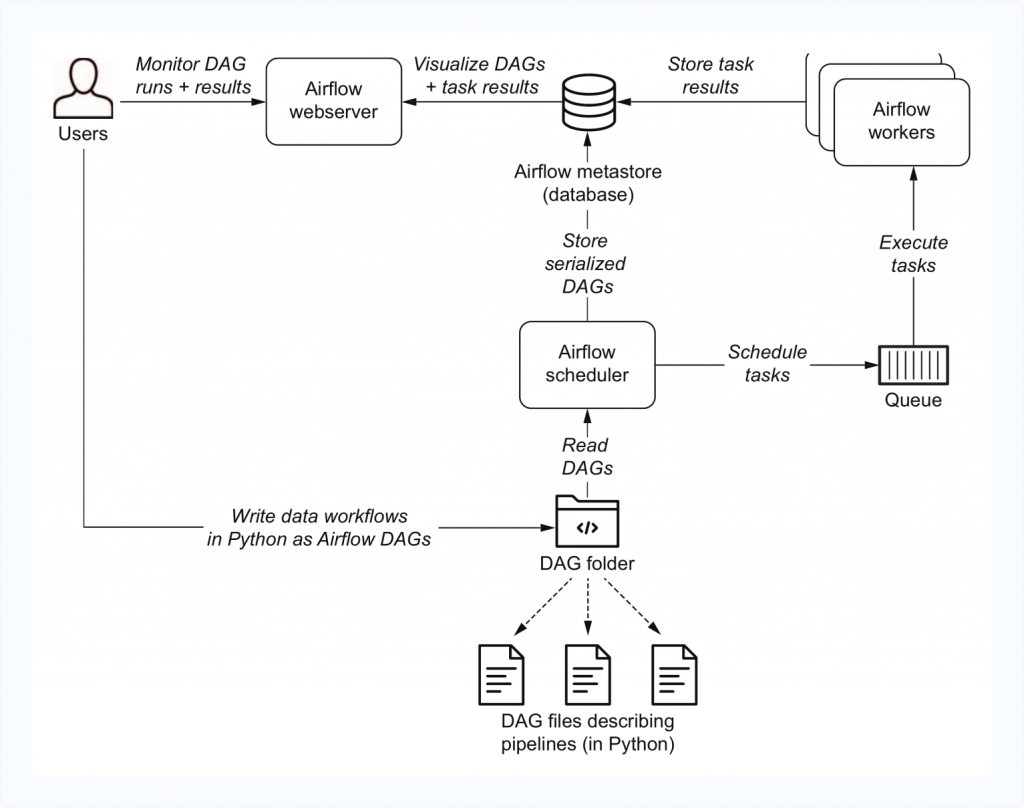
How Apache Airflow works and Architecture?
Apache Airflow uses a directed acyclic graph (DAG) model to represent workflows. A DAG is a collection of tasks, where each task represents a step in the workflow, and edges between tasks represent task dependencies. Airflow schedules and executes these tasks based on the specified DAG definition.
The key components of Apache Airflow are:
- Scheduler: The scheduler manages the execution of DAGs based on their schedules and task dependencies.
- Metastore: The metastore (usually a database) stores the metadata about DAGs, tasks, and execution states.
- Executor: The executor is responsible for executing tasks on workers (e.g., local, Celery, Kubernetes).
- Web UI: The web-based user interface allows users to view, monitor, and manage DAGs and tasks.
- DAGs Folder: The DAGs folder contains the Python scripts that define the workflows as DAGs.
How to Install Apache Airflow?
Installing Apache Airflow involves setting up the required dependencies and components. Here’s a general procedure of the installation process:
- Install Python: Apache Airflow requires Python to be installed on your system. Make sure you have Python (preferably Python 3.6 or later) installed.
- Install Apache Airflow: You can install Apache Airflow using pip, a Python package manager. Implement the below command to install Airflow:
pip install apache-airflow- Initialize Airflow Database: Airflow requires a database to store its metadata. Initialize the database by running:
airflow db init- Start Airflow Webserver and Scheduler: Start the Airflow webserver and scheduler to enable the Airflow web interface and DAG execution:
airflow webserver --port 8080
airflow scheduler
Once you have completed these steps, you can access the Airflow web interface by navigating to http://localhost:8080 in your web browser. From the web interface, you can configure and manage your DAGs, set up connections to external systems, and monitor the status of your workflows. To define your workflows, create Python scripts in the DAGs folder, which will be automatically picked up by Airflow.
Depending on your specific requirements and environment, additional configuration or setup might be necessary. Be sure to refer to the official Apache Airflow documentation for more detailed installation and configuration instructions: https://airflow.apache.org/docs/apache-airflow/stable/start.html
Basic Tutorials of Apache Airflow: Getting Started
Certainly! Let’s come to the step-by-step basic tutorial to help you get started with Apache Airflow:
Step 1: Install Apache Airflow
- Make sure you have Python (preferably Python 3.6 or later) installed on your system.
- Install Apache Airflow using pip, a Python package manager. Open a command prompt or terminal and implement the following command:
pip install apache-airflowStep 2: Initialize the Airflow Database
- In the same terminal or command prompt, run the following command to initialize the Airflow database:
airflow db initStep 3: Start the Scheduler and Airflow Web Server
- To start the Airflow web server, run the following command:
airflow webserver --port 8080- To start the Airflow scheduler, open another terminal or command prompt and run:
airflow schedulerStep 4: Access the Airflow Web Interface
- Open your web browser and navigate to
http://localhost:8080. - You should see the Airflow web interface, where you can configure and manage your DAGs (workflows).
Step 5: Define Your First DAG
- Create a new Python script in the
DAGsfolder. By default, it is located at$AIRFLOW_HOME/dags. Replace$AIRFLOW_HOMEwith the path to your Airflow installation. - In the Python script, import the necessary modules:
   from datetime import datetime, timedelta
   from airflow import DAG
   from airflow.operators.dummy_operator import DummyOperator
from airflow.operators.python_operator import PythonOperatorCode language: JavaScript (javascript)- Define the default arguments for the DAG:
   default_args = {
       'owner': 'your_name',
       'start_date': datetime(2023, 7, 31),
       'retries': 1,
       'retry_delay': timedelta(minutes=5),
}Code language: JavaScript (javascript)- Instantiate the DAG:
   dag = DAG(
       'my_first_dag',
       default_args=default_args,
       description='My first Apache Airflow DAG',
       schedule_interval=timedelta(days=1),
)Code language: JavaScript (javascript)- Define tasks in the DAG using operators. For example, add two PythonOperator tasks and a DummyOperator:
   def task_hello():
       print("Hello, Airflow!")

   def task_goodbye():
       print("Goodbye, Airflow!")

   start_task = DummyOperator(task_id='start_task', dag=dag)
   hello_task = PythonOperator(task_id='hello_task', python_callable=task_hello, dag=dag)
goodbye_task = PythonOperator(task_id='goodbye_task', python_callable=task_goodbye, dag=dag)Code language: PHP (php)- Define the task dependencies by setting up the DAG’s workflow:
   start_task >> hello_task
   start_task >> goodbye_task
Step 6: Test the DAG
- Save the Python script and go back to the Airflow web interface.
- Click on the “DAGs” tab in the left navigation menu, and you should see your DAG listed.
- Toggle the DAG to “On” to enable it for scheduling.
- Click on the “Trigger DAG” button to manually trigger the DAG and execute its tasks.
Step 7: Monitor the DAG Execution
- After triggering the DAG, go to the “DAGs” tab and click on the DAG’s name to view its progress.
- From here, you can monitor the status of individual tasks, view logs, and troubleshoot any issues.
Congratulations! You’ve created and executed your first Apache Airflow DAG. This tutorial covers a simple DAG, but Airflow is capable of handling complex workflows with multiple tasks and dependencies. As you become more familiar with Airflow, you can explore advanced features, such as sensors, operators, variables, and parameterized DAGs, to build sophisticated data workflows and automation tasks. Don’t forget to check the official Apache Airflow documentation (https://airflow.apache.org/) for more in-depth tutorials and examples.

👤 About the Author
Ashwani is passionate about DevOps, DevSecOps, SRE, MLOps, and AiOps, with a strong drive to simplify and scale modern IT operations. Through continuous learning and sharing, Ashwani helps organizations and engineers adopt best practices for automation, security, reliability, and AI-driven operations.
🌐 Connect & Follow:
- Website: WizBrand.com
- Facebook: facebook.com/DevOpsSchool
- X (Twitter): x.com/DevOpsSchools
- LinkedIn: linkedin.com/company/devopsschool
- YouTube: youtube.com/@TheDevOpsSchool
- Instagram: instagram.com/devopsschool
- Quora: devopsschool.quora.com
- Email– contact@devopsschool.com
