Step 1 – Install Docker
Step 2 – Install Zabbix Agent 2
Step 3 – Configure Zabbix Agent 2
Step 4 – Fix the permission
Zabbix Agent(/usr/sbin/zabbix_agentd) and Zabbix Server(/usr/sbin/zabbix_server) run with a user called “zabbix”. Docker monitoring commands can be run only by the user if root or a user which is part of linux group called “docker”. thus, For the Zabbix agent to keep an eye on Docker containers, you need to add the Zabbix user, which is installed by default, to the docker group.
$ sudo usermod -aG docker zabbix
Step 5 – ReStart a Zabbix Agent
$ sudo systemctl restart zabbix-agent2
$ sudo systemctl enable zabbix-agent2
$ sudo systemctl status zabbix-agent2
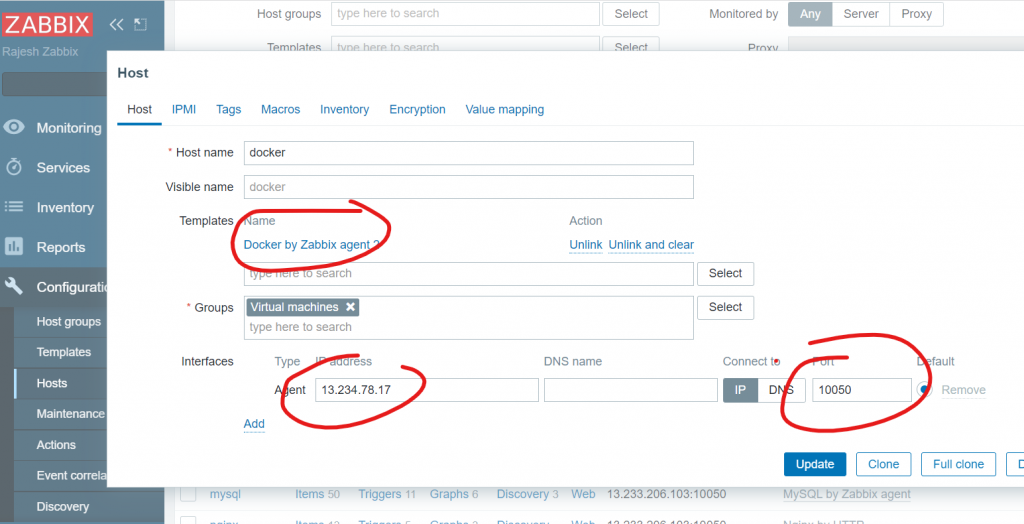
Step 6 – Add the Docker Host to Zabbix Server for Monitoring
Step 7 – Add the Docker Host with zabbix template “Docker by Zabbix agent”

Step 8 – Create a few Dummy containers in Docker host
$ docker run -itd ubuntu
$ docker run -itd ubuntu
$ docker run -itd ubuntu
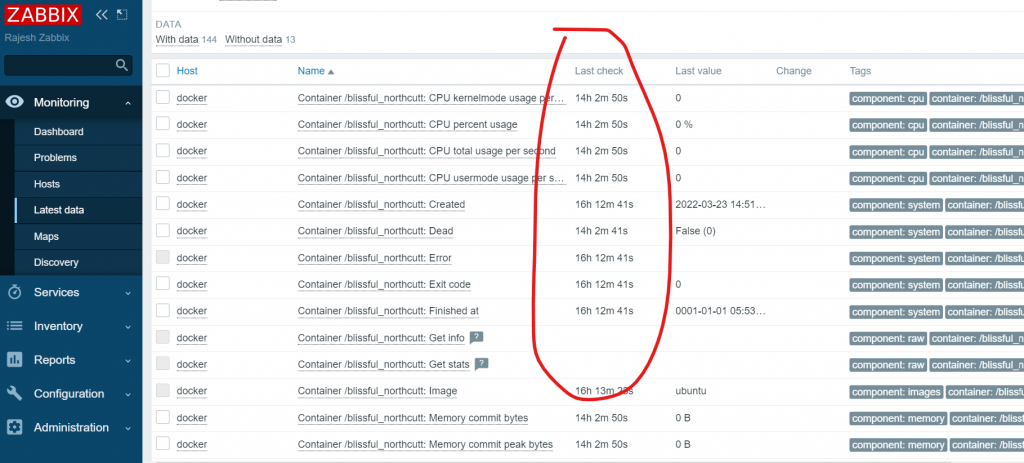
Step 9 – Validate Docker metrices at Zabbix front end Latest data.
Now head back to the Zabbix server dashboard. Click on ‘Monitoring’ then ‘Hosts’. Click on the name of your Docker server and in the menu option that appears, select ‘Latest data’.

I’m a DevOps/SRE/DevSecOps/Cloud Expert passionate about sharing knowledge and experiences. I am working at Cotocus. I blog tech insights at DevOps School, travel stories at Holiday Landmark, stock market tips at Stocks Mantra, health and fitness guidance at My Medic Plus, product reviews at I reviewed , and SEO strategies at Wizbrand.
Please find my social handles as below;
Rajesh Kumar Personal Website
Rajesh Kumar at YOUTUBE
Rajesh Kumar at INSTAGRAM
Rajesh Kumar at X
Rajesh Kumar at FACEBOOK
Rajesh Kumar at LINKEDIN
Rajesh Kumar at PINTEREST
Rajesh Kumar at QUORA
Rajesh Kumar at WIZBRAND

 Starting: 1st of Every Month
  +91 8409492687
  Contact@DevOpsSchool.com
