There are 2 default template has been given by Zabbix which can be used to MySQL metrices monitoring
- MySQL by Zabbix agent
- MySQL by Zabbix agent 2
Zabbix Template – MySQL by Zabbix agent
For Zabbix version: 6.0 and higher. The template is developed for monitoring DBMS MySQL and its forks.
This template was tested on:
- MySQL, version 5.7, 8.0
- Percona, version 8.0
- MariaDB, version 10.4
Step 1 – Install MySQL Server or MariaDB
Step 2 – Install Zabbix agent
Step 4 – Work on template_db_mysql.conf
Copy template_db_mysql.conf into the folder with Zabbix agent configuration (/etc/zabbix/zabbix_agentd.d/ by default). Don't forget to restart Zabbix agent.
- https://gist.github.com/devops-school/155ad219966fdca8684e394a6df81681
- https://git.zabbix.com/projects/ZBX/repos/zabbix/browse/templates/db/mysql_agent

OR

# UBUNTU
$ sudo apt install mlocate
$ locate userparam
$ cp /usr/share/doc/zabbix-agent/userparameter_mysql.conf /etc/zabbix/zabbix_agentd.d/template_db_mysql.conf

#Centos/RHEL
$ yum install mlocate
$ updatedb
$ locate userparam
$ cp /usr/share/doc/zabbix-agent-6.0.0/userparameter_mysql.conf /etc/zabbix/zabbix_agentd.d/template_db_mysql.conf

Step 5 – Create a MySQL user for monitoring ( at your discretion):
locate my.cnf
vi /etc/my.cnf

$ systemctl stop mysql
$ systemctl start mysql
or
$ service stop mysql
$ service start mysql
$ mysql -u root -p
CREATE USER 'zbx_monitor'@'%' IDENTIFIED BY 'DevOpsSchool$123';
GRANT ALL PRIVILEGES ON *.* TO 'zbx_monitor'@'%' IDENTIFIED BY 'DevOpsSchool$123' WITH GRANT OPTION;
FLUSH PRIVILEGES;
quit;Step 6 – Create “.my.cnf” in the home directory of Zabbix agent
$ mkdir /var/lib/zabbix
$ vi /var/lib/zabbix/.my.cnf

Create ".my.cnf" in the home directory of Zabbix agent for Linux (/var/lib/zabbix by default ) or my.cnf in c:\ for Windows. The file must have three strings:

[client]
user='zbx_monitor'
password='DevOpsSchool$123'
Step 7 – Restart Zabbix Agent
$ service zabbix-agent start
$ systemctl enable zabbix-agent
$ service zabbix-agent restart
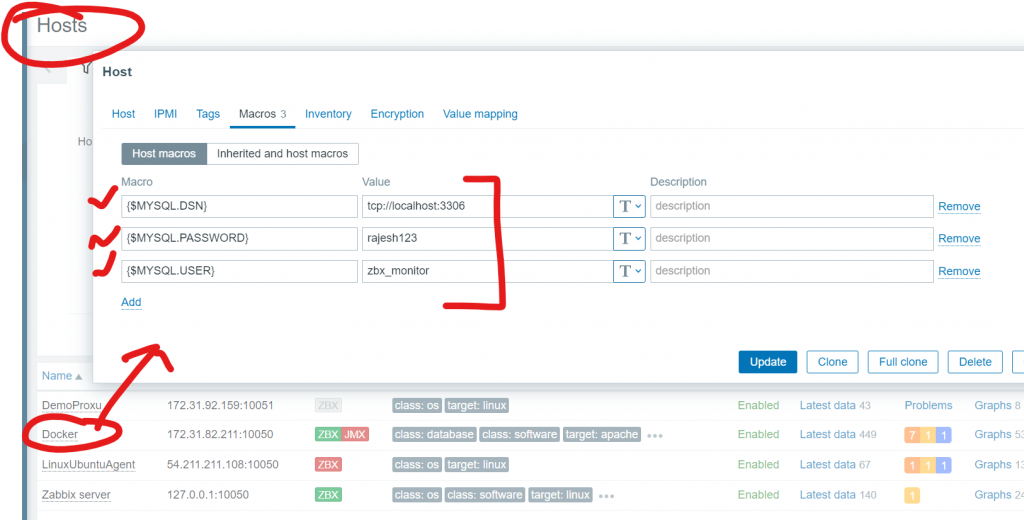
Step – 8 Add Macros to mysql host
- In the Macros tab, switch to Inherited and host macros, look for the following macros and click on Change next to the macro value to update it:
- {$MYSQL.DSN} – set the data source of the MySQL server (the connection string of a named session from the MySQL Zabbix agent 2 plugin configuration file). This guide uses the default data source “tcp://localhost:3306” for monitoring a MySQL server that is installed on the same machine as Zabbix server and Zabbix agent 2.
- {$MYSQL.PASSWORD} – set the password of the previously created MySQL user “zbx_monitor”.
- {$MYSQL.USER} – set the name of the previously created MySQL user “zbx_monitor”.

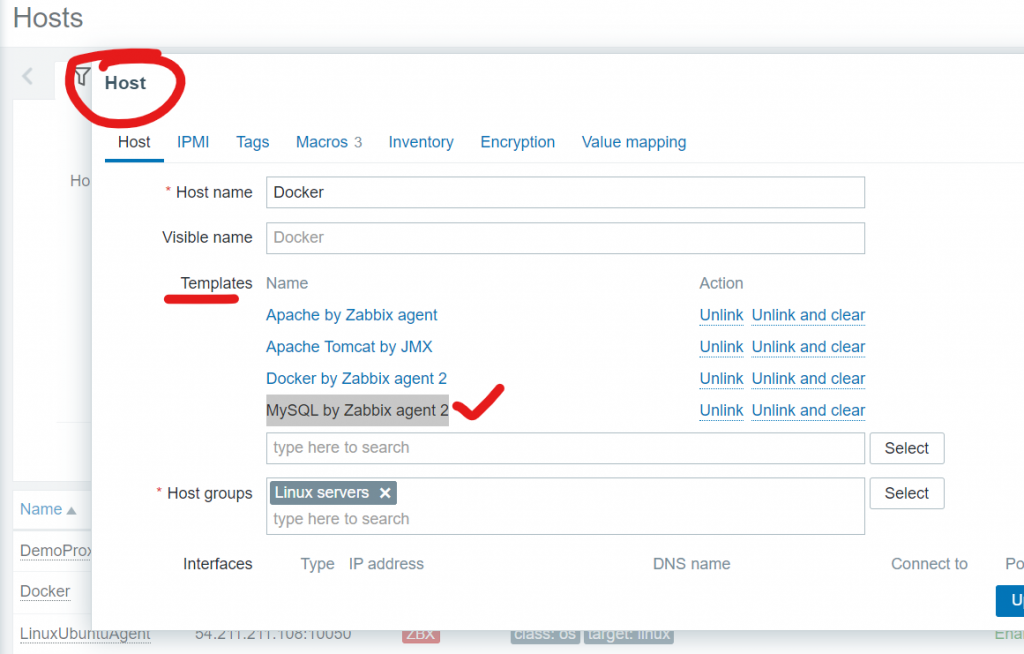
Add MySQL by Zabbix agent 2 to MySql HOST


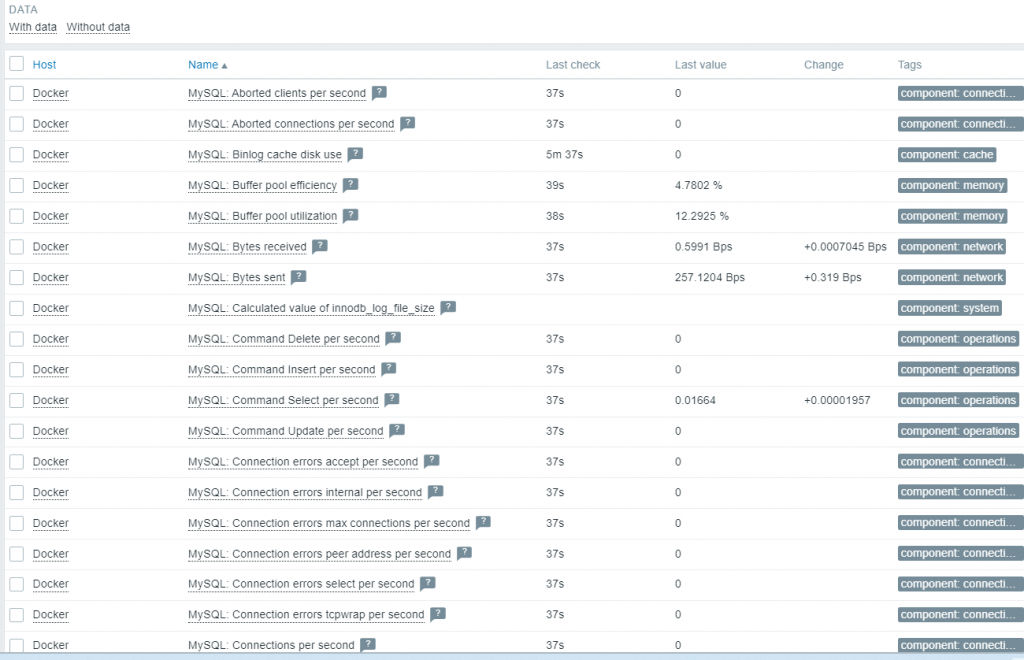
Step 8 – Validate MySql Data in Zabbix

Reference
- https://www.zabbix.com/documentation/current/en/manual/guides/monitor_mysql
- https://git.zabbix.com/projects/ZBX/repos/zabbix/browse/templates/db/mysql_agent?at=release/6.4
- https://git.zabbix.com/projects/ZBX/repos/zabbix/browse/templates/db/mysql_agent2?at=release%2F6.4
- https://git.zabbix.com/projects/ZBX/repos/zabbix/browse/templates/db/mysql_agent2?at=release/6.4
- https://www.zabbix.com/integrations/mysql#mysql_agent2
- https://www.zabbix.com/integrations/mysql#mysql_agent
I’m a DevOps/SRE/DevSecOps/Cloud Expert passionate about sharing knowledge and experiences. I am working at Cotocus. I blog tech insights at DevOps School, travel stories at Holiday Landmark, stock market tips at Stocks Mantra, health and fitness guidance at My Medic Plus, product reviews at I reviewed , and SEO strategies at Wizbrand.
Please find my social handles as below;
Rajesh Kumar Personal Website
Rajesh Kumar at YOUTUBE
Rajesh Kumar at INSTAGRAM
Rajesh Kumar at X
Rajesh Kumar at FACEBOOK
Rajesh Kumar at LINKEDIN
Rajesh Kumar at PINTEREST
Rajesh Kumar at QUORA
Rajesh Kumar at WIZBRAND

 Starting: 1st of Every Month
  +91 8409492687
  Contact@DevOpsSchool.com

Giving full access to the zabbix service user seems very insecure, especially as the creds are stored in plaintext ondisk. :/
How can I monitor MySQL databases by SNMP from ZABBIX?
Can you help provide tips or website to do it?