
 Starting: 1st of Every Month
  +91 8409492687
  Contact@DevOpsSchool.com
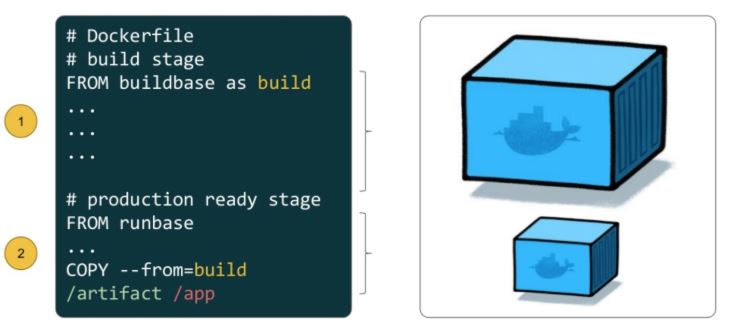
Problem with traditional approach of creating docker image?
One of the most challenging things about building images is keeping the image size down. Each instruction in the Dockerfile adds a layer to the image, and you need to remember to clean up any artifacts you don’t need before moving on to the next layer.
It was actually very common to have one Dockerfile to use for development (which contained everything needed to build your application), and a slimmed-down one to use for production, which only contained your application and exactly what was needed to run it. This has been referred to as the “builder pattern”. Maintaining two Dockerfiles is not ideal.
What is Docker multistaging build?
Multi-stage builds are a method of organizing a Dockerfile to minimize the size of the final container, improve run time performance, allow for better organization of Docker commands and files, and provide a standardized method of running build actions. A multi-stage build is done by creating different sections of a Dockerfile, each referencing a different base image. This allows a multi-stage build to fulfill a function previously filled by using multiple docker files, copying files between containers, or running different pipelines.
Before multi-stage builds
Dockerfile.build:
FROM golang:1.7.3
WORKDIR /go/src/github.com/alexellis/href-counter/
COPY app.go .
RUN go get -d -v golang.org/x/net/html \
  && CGO_ENABLED=0 GOOS=linux go build -a -installsuffix cgo -o app .
Dockerfile:
FROM alpine:latest
RUN apk --no-cache add ca-certificates
WORKDIR /root/
COPY app .
CMD ["./app"]
build.sh:
#!/bin/sh
echo Building alexellis2/href-counter:build

docker build --build-arg https_proxy=$https_proxy --build-arg http_proxy=$http_proxy \
    -t alexellis2/href-counter:build . -f Dockerfile.build

docker container create --name extract alexellis2/href-counter:build
docker container cp extract:/go/src/github.com/alexellis/href-counter/app ./app
docker container rm -f extract

echo Building alexellis2/href-counter:latest

docker build --no-cache -t alexellis2/href-counter:latest .
rm ./app
When you run the build.sh script, it needs to build the first image, create a container from it to copy the artifact out, then build the second image. Both images take up room on your system and you still have the app artifact on your local disk as well.
Multi-stage builds vastly simplify this situation!
 by
by 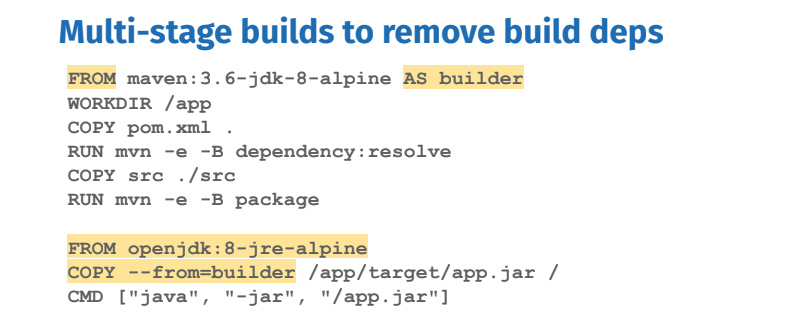
After Use multi-stage builds
With multi-stage builds, you use multiple FROM statements in your Dockerfile. Each FROM instruction can use a different base, and each of them begins a new stage of the build. You can selectively copy artifacts from one stage to another, leaving behind everything you don’t want in the final image. To show how this works, let’s adapt the Dockerfile from the previous section to use multi-stage builds.
Dockerfile:
FROM golang:1.7.3
WORKDIR /go/src/github.com/alexellis/href-counter/
RUN go get -d -v golang.org/x/net/html
COPY app.go .
RUN CGO_ENABLED=0 GOOS=linux go build -a -installsuffix cgo -o app .

FROM alpine:latest
RUN apk --no-cache add ca-certificates
WORKDIR /root/
COPY --from=0 /go/src/github.com/alexellis/href-counter/app .
CMD ["./app"] You only need the single Dockerfile. You don’t need a separate build script, either. Just run docker build.
Refernece https://medium.com/capital-one-tech/multi-stage-builds-and-dockerfile-b5866d9e2f84
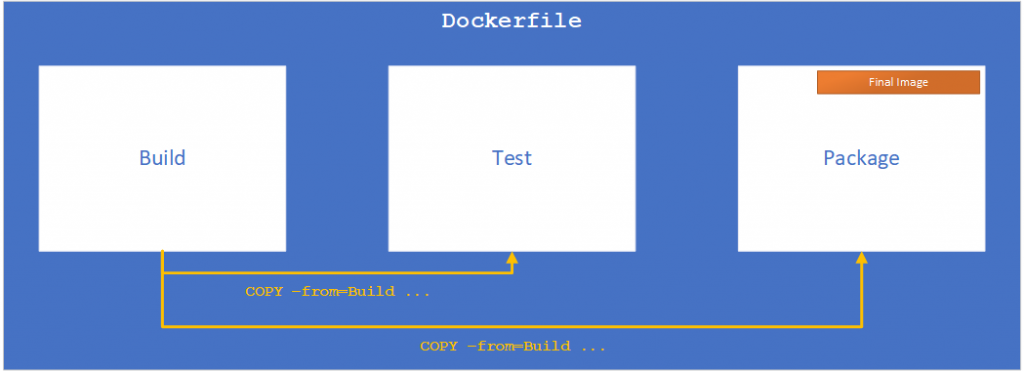
Now that we have an idea of what a multi-stage build is, and the problem it purports to solve, let’s try writing a Dockerfile for our example pipeline — covering build, lint, test, static code analysis, dynamic code analysis, and finally deployment.
For this example, we’re going to put a Node application through our pipeline, and we’re going to use a multi-stage Dockerfile to do so. For that, we’re going to use a base Dockerfile that runs NPM install. Right now, all we are going to do is add a section header.
# Copies in our code and runs NPM Install
FROM node:latest as builder
WORKDIR /usr/src/app
COPY package* ./
COPY src/ src/
RUN [“npm”, “install”]
Perhaps we need to run a linter against a set of rules like the AirBnB set of ES6 rules. For this, we are going to copy from a previous stage — builder — to make sure that we don’t end up with modified or extra code. We only want code that is sourced from the initial copy in to be looked at. In the graphic I’ve used eslinter, though there are a variety of javascript linters available, an alternative would be jslint.
# Lints Code
FROM node:latest as linting
WORKDIR /usr/src/app
COPY — from=builder /usr/src/app/src .
RUN [“npm”, “lint”]
Like a lot of applications for a lot of companies, you’ll probably use something for static code analysis. Here I’ve used SonarQube as an example because it’s open source, easy to use, and easy to set up. However, you could also write a Dockerfile scanner for any static analysis tool your company or application uses; a variety of alternatives to Sonarqube are listed here on Wikipedia.
# Gets Sonarqube Scanner from Dockerhub and runs it
FROM newtmitch/sonar-scanner:latest as sonarqube
COPY — from=builder /usr/src/app/src /root/src
Hopefully you’re writing unit tests, right? And making sure that you’ve covered your business logic code with tests that show whether errors have happened, the data is validated, etc.? This is a simple, generalized example, but it makes sure that only the intended code is tested by copying from a previous testing stage. This helps guarantee a repeatable result. In the graphic/code I’ve used jest to represent unit testing, though there are a litany of testing frameworks. Examples include: JSUnit, Mocha, and Jasmine.
# Runs Unit Tests
FROM node:latest as unit-tests
WORKDIR /usr/src/app
COPY --from=builder /usr/src/app/ .
RUN [“npm”, “test”]
Similar to unit testing, we run whatever accessibility tests are desired. Hopefully you are doing those so that people who are color-blind, for example, can use your app/website. For more info on accessibility testing see this article. In the graphic and code I’ve used Pa11y to represent unit testing though there are both open and closed source alternatives like AATT by Paypal.
# Runs Accessibility Tests
FROM node:latest as access-tests
WORKDIR /usr/src/app
COPY --from=builder /usr/src/app/ .
RUN [“npm”, “access-tests”]
Finally the actual application stage. For this stage we copy in the build files from the destination, and any package.json/package-lock.json files and then run npm start. However this would obviously be different if you were using some other language/method of running the application.
# Starts and Serves Web Page
FROM node:latest as serve
WORKDIR /usr/src/app
COPY --from=builder /usr/src/app/dest ./
COPY --from=builder /usr/src/app/package* ./
RUN [“npm”, “start”]
FROM node:latest as builder
WORKDIR /usr/src/app
COPY package* ./
COPY src/ src/
RUN [“npm”, “install”]
# Lints Code
FROM node:latest as linting
WORKDIR /usr/src/app
COPY --from=builder /usr/src/app/ .
RUN [“npm”, “lint”]
# Gets Sonarqube Scanner from Dockerhub and runs it
FROM newmitch/sonar-scanner:latest as sonarqube
COPY --from=builder /usr/src/app/src /root/src
# Runs Unit Tests
FROM node:latest as unit-tests
WORKDIR /usr/src/app
COPY --from=builder /usr/src/app/ .
RUN [“npm”, “test”]
# Runs Accessibility Tests
FROM node:latest as access-tests
WORKDIR /usr/src/app
COPY --from=builder /usr/src/app/ .
RUN [“npm”, “access-tests”]
# Starts and Serves Web Page
FROM node:latest as serve
WORKDIR /usr/src/app
COPY --from=builder /usr/src/app/dest ./
COPY --from=builder /usr/src/app/package* ./
RUN [“npm”, “start”]
You’ll notice that in each of the sections, following the base image, is a name listed following: as This allows individual sections to be run by doing: docker build --target builder -t example-node:latest .
Docker Tutorials Fundamental To Advanced-2021 Crash Course:- https://bit.ly/3hOIbTB
I’m a DevOps/SRE/DevSecOps/Cloud Expert passionate about sharing knowledge and experiences. I am working at Cotocus. I blog tech insights at DevOps School, travel stories at Holiday Landmark, stock market tips at Stocks Mantra, health and fitness guidance at My Medic Plus, product reviews at I reviewed , and SEO strategies at Wizbrand.
Please find my social handles as below;
Rajesh Kumar Personal Website
Rajesh Kumar at YOUTUBE
Rajesh Kumar at INSTAGRAM
Rajesh Kumar at X
Rajesh Kumar at FACEBOOK
Rajesh Kumar at LINKEDIN
Rajesh Kumar at PINTEREST
Rajesh Kumar at QUORA
Rajesh Kumar at WIZBRAND
