ls – List directory contents.
Basic Listing: Lists the visible files and directories in the current directory.

$ ls

Listing With Details: Displays detailed information including file permissions, number of links, owner, group, size, and timestamp.

$ ls -l

Listing All Files

ls -a: Lists all files, including hidden files (those beginning with a dot .).
Long Listing of All Files

ls -la or ls -l -a: Combines the detailed output with hidden files.
Listing With Human-Readable Sizes

ls -lh: Shows file sizes in a human-readable format (e.g., KB, MB).
Reverse Order Listing

ls -r: Lists files and directories in reverse alphabetical order.
Sorting by Modification Time

ls -lt: Lists files sorted by modification time, newest first.
Recursive Listing

ls -R: Lists all files recursively, including the content of subdirectories.
Listing Inodes

ls -i: Displays the inode number of each file along with the file name.
Colorized Listing

ls --color: Displays a colorized listing where colors signify types of files (like directories, files, and links).Code language: JavaScript (javascript)
cd – Change the current directory
# 1. Change to the home directory of the current user
cd ~

# 2. Go up one level from the current directory
cd ..

# 3. Go to the root directory
cd /

# 4. Change to a specific directory by path
cd /usr/local/bin

# 5. Go back to the previous directory
cd -

# 6. Change to the user's home directory (another way)
cd

# 7. Change to a directory with spaces in the name
cd "/path/to/the directory with spaces"

# 8. Change to a directory using a relative path
cd ./subfolder

# 9. Change to a directory using an environment variable
cd $HOME/Documents

# 10. Change to a directory using a tilde expansion for another user's home directory
cd ~otheruser
Code language: PHP (php)
pwd – Print the name of the current working directory.
touch – Create an empty file or update the access and modification times of a file.
mkdir – Create a new directory.
# 1. Create a single new directory
mkdir new_directory

# 2. Create multiple directories at once
mkdir dir1 dir2 dir3

# 3. Create a directory with intermediate directories (i.e., create parent directories as needed)
mkdir -p parent_directory/sub_directory/sub_sub_directory

# 4. Create a directory with specific permissions set at the time of creation
mkdir -m 755 secure_directory

# 5. Create directories with verbose output to show what is being done
mkdir -v verbose_directory
Code language: PHP (php)
rm – Remove files or directories.
rmdir – Remove empty directories.
cp – Copy files and directories.
# 1. Copy a file to another directory
cp source.txt /path/to/destination/

# 2. Copy multiple files to another directory
cp source1.txt source2.txt /path/to/destination/

# 3. Copy a file and rename it in the destination
cp source.txt /path/to/destination/renamed.txt

# 4. Copy a directory recursively to another location
cp -r /path/to/sourceDir /path/to/destinationDir

# 5. Copy files with verbose output (shows files as they are copied)
cp -v source.txt /path/to/destination/

# 6. Copy all files with a specific extension
cp *.txt /path/to/destination/

# 7. Copy all files and directories within a directory to another location
cp -R /path/to/sourceDir/* /path/to/destinationDir/

# 8. Preserve the mode, ownership, and timestamps
cp -p source.txt /path/to/destination/

# 9. Copy a directory to another location, overwriting files in the destination
cp -rT /path/to/sourceDir /path/to/destinationDir

# 10. Copy a file interactively, prompting before overwrite
cp -i source.txt /path/to/destination/
Code language: PHP (php)
mv – Move or rename files and directories.
# 1. Rename a file
mv oldname.txt newname.txt

# 2. Move a file to another directory
mv filename.txt /path/to/destination/

# 3. Move multiple files to another directory
mv file1.txt file2.txt /path/to/destination/

# 4. Move and rename a file in one operation
mv oldfile.txt /path/to/destination/newfile.txt

# 5. Rename a directory
mv oldDirName newDirName

# 6. Move a directory to another location
mv /path/to/sourceDir /path/to/destinationDir

# 7. Move multiple directories to another directory
mv dir1 dir2 /path/to/destination/

# 8. Use wildcard to move multiple files of a specific type
mv *.txt /path/to/destination/

# 9. Move files interactively, prompting before overwrite
mv -i source.txt /path/to/destination/

# 10. Verbosely move files, showing files as they are moved
mv -v file1.txt /path/to/destination/
Code language: PHP (php)
echo – Display a line of text/string to the terminal.
cat – Concatenate and display the content of files.
# 1. Display the content of a single file
cat file1.txt

# 2. Concatenate multiple files and display the content
cat file1.txt file2.txt

# 3. Concatenate files and redirect the output to a new file
cat file1.txt file2.txt > combined.txt

# 4. Append content of one file to another
cat file1.txt >> file2.txt

# 5. Display line numbers while viewing the content of a file
cat -n file1.txt
Code language: PHP (php)
more – View file content page by page.
# 1. View the contents of a file page by page
more filename.txt

# 2. View multiple files sequentially
more file1.txt file2.txt

# 3. Display a specific number of lines at a time
more -num 20 filename.txt

# 4. Start viewing from a specific line
more +100 filename.txt

# 5. View the contents of a file with line numbers
more -n filename.txt
Code language: PHP (php)grep – Search for patterns within files.
# 1. Search for a specific string in a file
grep "pattern" filename.txt

# 2. Search for a pattern in multiple files
grep "pattern" file1.txt file2.txt

# 3. Count the number of lines that match the pattern
grep -c "pattern" filename.txt

# 4. Display line numbers with the lines that match the pattern
grep -n "pattern" filename.txt

# 5. Search for a pattern in all files in a directory
grep "pattern" /path/to/directory/*

# 6. Ignore case while searching
grep -i "pattern" filename.txt

# 7. Search for a pattern recursively in all files in a directory and subdirectories
grep -r "pattern" /path/to/directory

# 8. Invert match to display lines that do not contain the pattern
grep -v "pattern" filename.txt

# 9. Search for lines that match one of multiple patterns
grep -e "pattern1" -e "pattern2" filename.txt

# 10. Display only the names of files with lines matching the pattern
grep -l "pattern" /path/to/directory/*
Code language: PHP (php)
find – Search for files in a directory hierarchy.
# 1. Find all files in the current directory and its subdirectories
find .

# 2. Find all files with a specific name
find /path/to/search -name filename.txt

# 3. Find all files with a specific extension in a directory
find /path/to/search -type f -name "*.txt"

# 4. Find and delete all files with a specific extension
find /path/to/search -type f -name "*.tmp" -delete

# 5. Find directories with a specific name
find /path/to/search -type d -name "dirName"

# 6. Find files larger than a certain size
find /path/to/search -type f -size +100M

# 7. Find files modified in the last 7 days
find /path/to/search -type f -mtime -7

# 8. Find files accessed in the last 24 hours
find /path/to/search -type f -atime -1

# 9. Find files with specific permissions
find /path/to/search -type f -perm 0644

# 10. Execute a command on all found files
find /path/to/search -type f -name "*.txt" -exec cat {} \;
Code language: PHP (php)
chmod – Change file access permissions.
# 1. Give the owner (user) execute permission on a file
chmod u+x filename

# 2. Remove write permission from the group and others for a file
chmod go-w filename

# 3. Set read and write permissions for the owner, and read permission for the group, no permissions for others
chmod 640 filename

# 4. Set read, write, and execute permissions for the owner, and read and execute permissions for the group and others
chmod 755 filename

# 5. Add execute permission for all (user, group, and others) on a file
chmod a+x filename

# 6. Remove all permissions for the group and others
chmod go= filename

# 7. Set the exact permissions for a file (read and write for owner, read for group, none for others)
chmod 640 filename

# 8. Recursively give the owner and group read and write permissions on a directory and its contents, while removing all permissions for others
chmod -R 660 directoryname

# 9. Ensure a file is executable by everyone
chmod a+x filename

# 10. Set sticky bit on a directory to prevent deletion of files by non-owners
chmod +t directoryname
Code language: PHP (php)
chown – Change file owner and group.
head – Output the first part of files.
tail – Output the last part of files.
diff – Compare files line by line.
tar – Archive files.
wget – Non-interactive network downloader.
curl – Transfer data from or to a server.
ssh – Secure Shell, a protocol to securely access remote machines.
scp – Secure copy (remote file copy program).
ps – Report a snapshot of current processes.
top – Display Linux processes.
kill – Send a signal to a process.
nano – Command-line text editor.
vi – Visual text editor.
sudo – Execute a command as another user, typically the superuser.
df – Report file system disk space usage.
du – Estimate file space usage.
man – An interface to the system reference manuals.
whatis – Display one-line manual page descriptions.
alias – Create an alias for a command.
unalias – Remove an alias.
apt-get – Command-line tool for handling packages (Debian-based systems).
yum – Command-line package-management utility (Red Hat-based systems).
dnf – Fedora package manager.
mount – Mount a filesystem.
umount – Unmount a filesystem.
systemctl – Control the systemd system and service manager.
journalctl – Query and display messages from the journal.
netstat – Network statistics.
ping – Send ICMP ECHO_REQUEST to network hosts.
ifconfig – Configure a network interface.
traceroute – Trace the route taken by packets over an IPv4/IPv6 network.
ip – Show / manipulate routing, network devices, interfaces, and tunnels.
crontab – Schedule commands to run at a set time.
useradd – Create a new user or update default new user information.
passwd – Update a user’s authentication token(s).
File Commands
List files in the directory:
lsList all files:
ls -aShow directory you are currently working in:
pwdCreate a new directory:
mkdir [directory]Code language: CSS (css)Remove a file:
rm [file_name] Code language: CSS (css)Remove a directory recursively:
rm -r [directory_name]Code language: CSS (css)Recursively remove a directory without requiring confirmation:
rm -rf [directory_name]Code language: CSS (css)Copy the contents of one file to another file:
cp [file_name1] [file_name2]Code language: CSS (css)Recursively copy the contents of one file to a second file:
cp -r [directory_name1] [directory_name2]Code language: CSS (css)Rename [file_name1] to [file_name2] with the command:
mv [file_name1] [file_name2]Code language: CSS (css)Create a symbolic link to a file:
ln -s /path/to/[file_name] [link_name]Create a new file using touch:
touch [file_name]Code language: CSS (css)Show the contents of a file:
more [file_name]Code language: CSS (css)or use the cat command:
cat [file_name]Code language: CSS (css)Append file contents to another file:
cat [file_name1] >> [file_name2]Code language: CSS (css)Display the first 10 lines of a file with head command:
head [file_name]Code language: CSS (css)Show the last 10 lines of a file:
tail [file_name]Code language: CSS (css)Encrypt a file:
gpg -c [file_name]Code language: CSS (css)Decrypt a file:
gpg [file_name.gpg]Code language: CSS (css)Show the number of words, lines, and bytes in a file using wc:
wcList number of lines/words/characters in each file in a directory with the xargs command:
ls | xargs wcCut a section of a file and print the result to standard output:
cut -d[delimiter] [filename]Code language: CSS (css)Cut a section of piped data and print the result to standard output:
[data] | cut -d[delimiter]Print all lines matching a pattern in a file:
awk '[pattern] {print $0}' [filename]Code language: JavaScript (javascript)Overwrite a file to prevent its recovery, then delete it:
shred -u [filename]Code language: CSS (css)Compare two files and display differences:
diff [file1] [file2]Code language: CSS (css)Read and execute the file content in the current shell:
source [filename]Code language: CSS (css)Sort file contents and print the result in standard output:
sort [options] filenameCode language: CSS (css)Store the command output in a file and skip the terminal output:
Move up one level in the directory tree structure:
cd ..Change directory to $HOME:
cdChange location to a specified directory:
cd /chosen/directoryFile Compression
Archive an existing file:
tar cf [compressed_file.tar] [file_name]Code language: CSS (css)Extract an archived file:
tar xf [compressed_file.tar]Code language: CSS (css)Create a gzip compressed tar file by running:
tar czf [compressed_file.tar.gz]Code language: CSS (css)Compress a file with the .gz extension:
File Transfer
Copy a file to a server directory securely using the Linux scp command:
scp [file_name.txt] [server/tmp]Code language: CSS (css)Synchronize the contents of a directory with a backup directory using the rsync command:
rsync -a [/your/directory] [/backup/] Code language: JavaScript (javascript)Users and Groups
See details about the active users:
idShow last system logins:
lastDisplay who is currently logged into the system with the who command:
whoShow which users are logged in and their activity:
wAdd a new group by typing:
groupadd [group_name]Code language: CSS (css)Add a new user:
adduser [user_name]Code language: CSS (css)Add a user to a group:
usermod -aG [group_name] [user_name]Code language: CSS (css)Temporarily elevate user privileges to superuser or root using the sudo command:
sudo [command_to_be_executed_as_superuser]Code language: CSS (css)Delete a user:
userdel [user_name] Code language: CSS (css)Modify user information with:
usermodChange directory group:
chgrp [group-name] [directory-name]
Code language: CSS (css)
Package Installation
List all installed packages with yum:
yum list installedCode language: PHP (php)Find a package by a related keyword:
yum search [keyword]Code language: CSS (css)Show package information and summary:
yum info [package_name]Code language: CSS (css)Install a package using the YUM package manager:
yum install [package_name.rpm]Code language: CSS (css)Install a package using the DNF package manager:
dnf install [package_name.rpm]Code language: CSS (css)Install a package using the APT package manager:
apt install [package_name]Code language: CSS (css)Install an .rpm package from a local file:
rpm -i [package_name.rpm]Code language: CSS (css)Remove an .rpm package:
rpm -e [package_name.rpm]Code language: CSS (css)Install software from source code:
tar zxvf [source_code.tar.gz]
cd [source_code]
./configure
make
make install
Process Related
See a snapshot of active processes:
psShow processes in a tree-like diagram:
pstreeDisplay a memory usage map of processes:
pmapSee all running processes:
topTerminate a Linux process under a given ID:
kill [process_id]Code language: CSS (css)Terminate a process under a specific name:
pkill [proc_name]Code language: CSS (css)Terminate all processes labelled “proc”:
killall [proc_name]Code language: CSS (css)List and resume stopped jobs in the background:
bgBring the most recently suspended job to the foreground:
fgBring a particular job to the foreground:
fg [job]Code language: CSS (css)List files opened by running processes:
lsofCatch a system error signal in a shell script:
trap "[commands-to-execute-on-trapping]" [signal]Code language: CSS (css)Pause terminal or a Bash script until a running process is completed:
waitRun a Linux process in the background:
nohup [command] &

Code language: CSS (css)
System Management and Information
Show system information:
uname -r See kernel release information:
uname -a Display how long the system has been running, including load average:
uptime See system hostname:
hostnameShow the IP address of the system:
hostname -i List system reboot history:
last reboot See current time and date:
dateQuery and change the system clock with:
timedatectl Show current calendar (month and day):
calList logged in users:
wSee which user you are using:
whoamiShow information about a particular user:
finger [username]Code language: CSS (css)View or limit system resource amounts:
ulimit [flags] [limit]Code language: CSS (css)Schedule a system shutdown:
shutdown [hh:mm]Code language: CSS (css)Shut Down the system immediately:
shutdown nowAdd a new kernel module:
modprobe [module-name]Code language: JavaScript (javascript)Disk Usage
You can use the df and du commands to check disk space in Linux.
See free and used space on mounted systems:
df -hShow free inodes on mounted filesystems:
df -iDisplay disk partitions, sizes, and types with the command:
fdisk -lSee disk usage for all files and directory:
du -ahShow disk usage of the directory you are currently in:
du -shDisplay target mount point for all filesystem:
findmntMount a device:
mount [device_path] [mount_point]Code language: CSS (css)SSH Login
Connect to host as user:
ssh user@hostCode language: CSS (css)Securely connect to host via SSH default port 22:
ssh hostConnect to host using a particular port:
ssh -p [port] user@hostCode language: CSS (css)Connect to host via telnet default port 23:
telnet hostFile Permission
Chown command in Linux changes file and directory ownership.
Assign read, write, and execute permission to everyone:
chmod 777 [file_name]Code language: CSS (css)Give read, write, and execute permission to owner, and read and execute permission to group and others:
chmod 755 [file_name]Code language: CSS (css)Assign full permission to owner, and read and write permission to group and others:
chmod 766 [file_name]Code language: CSS (css)Change the ownership of a file:
chown [user] [file_name]Code language: CSS (css)Change the owner and group ownership of a file:
chown [user]:[group] [file_name]

Code language: CSS (css)
Network
List IP addresses and network interfaces:
ip addr showAssign an IP address to interface eth0:
ip address add [IP_address]Code language: CSS (css)Display IP addresses of all network interfaces with:
ifconfigSee active (listening) ports with the netstat command:
netstat -pnltuShow tcp and udp ports and their programs:
netstat -nutlpDisplay more information about a domain:
whois [domain]Code language: CSS (css)Show DNS information about a domain using the dig command:
dig [domain] Code language: CSS (css)Do a reverse lookup on domain:
dig -x hostDo reverse lookup of an IP address:
dig -x [ip_address]Code language: CSS (css)Perform an IP lookup for a domain:
host [domain]Code language: CSS (css)Show the local IP address:
hostname -IDownload a file from a domain using the wget command:
wget [file_name]Code language: CSS (css)Receive information about an internet domain:
nslookup [domain-name]Code language: CSS (css)Save a remote file to your system using the filename that corresponds to the filename on the server:
curl -O [file-url]Code language: CSS (css)Variables
Assign an integer value to a variable:
let "[variable]=[value]"Code language: JavaScript (javascript)Export a Bash variable:
export [variable-name]Code language: JavaScript (javascript)Declare a Bash variable:
declare [variable-name]= "[value]"Code language: PHP (php)List the names of all the shell variables and functions:
setCode language: JavaScript (javascript)Display the value of a variable:
echo $[variable-name]Code language: PHP (php)Shell Command Management
Create an alias for a command:
alias [alias-name]='[command]'Code language: JavaScript (javascript)Set a custom interval to run a user-defined command:
watch -n [interval-in-seconds] [command]Code language: CSS (css)Postpone the execution of a command:
sleep [time-interval] && [command]Code language: CSS (css)Create a job to be executed at a certain time (Ctrl+D to exit prompt after you type in the command):
at [hh:mm]Code language: CSS (css)Display a built-in manual for a command:
man [command]Code language: CSS (css)Print the history of the commands you used in the terminal:
historyLinux Keyboard Shortcuts
Kill process running in the terminal:
Ctrl + CStop current process:
Ctrl + ZThe process can be resumed in the foreground with fg or in the background with bg.
Cut one word before the cursor and add it to clipboard:
Ctrl + WCut part of the line before the cursor and add it to clipboard:
Ctrl + UCut part of the line after the cursor and add it to clipboard:
Ctrl + KPaste from clipboard:
Ctrl + YRecall last command that matches the provided characters:
Ctrl + RRun the previously recalled command:
Ctrl + OExit command history without running a command:
Ctrl + GRun the last command again:
!!Log out of current session:
exit
Code language: PHP (php)
file
file command is used to determine the type of a file. .file type may be of human-readable(e.g. ‘ASCII text’) or MIME type(e.g. ‘text/plain; charset=us-ascii’). This command tests each argument in an attempt to categorize it.
It has three sets of tests as follows:
- filesystem test: This test is based on the result which returns from a stat system call. The program verifies that if the file is empty, or if it’s some sort of special file. This test causes the file type to be printed.
- magic test: These tests are used to check for files with data in particular fixed formats.
- language test: This test search for particular strings which can appear anywhere in the first few blocks of a file.
$ file email.py
$ file name.jpeg
$ file Invoice.pdf
$ file exam.ods
$ file videosong.mp4
$ man file

‘cmp’ command in Linux with examples
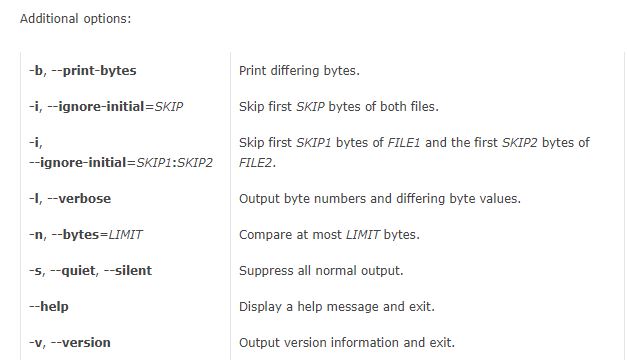
cmp command in Linux/UNIX is used to compare the two files byte by byte and helps you to find out whether the two files are identical or not.
- When cmp is used for comparison between two files, it reports the location of the first mismatch to the screen if difference is found and if no difference is found i.e the files compared are identical.
- cmp displays no message and simply returns the prompt if the the files compared are identical.
$ cat sample.txt
This is a sample text file

$ cat sample1.txt
This is another sample file

$ cmp sample.txt sample1.txt
sample.txt sample1.txt differ: byte 10, line 1

# How to compare two files using cmp
$ cmp file1.txt file2.txt

# How to make cmp print differing bytes
$ cmp -b file1.txt  file2.txt

# How to make cmp skip some initial bytes from both files
$ cmp -i 10 file1.txt  file2.txt

# How to make cmp display byte position (and value) for all differing bytes
$ cmp -l file1.txt  file2.txt

# How to limit number of bytes to be compared
$ cmp -n 25  file1.txt  file2.txt

# How to display progress meter while using cmp command
$ pv file1.txt | cmp -l file3.txt > output.txt

# How to make 'cmp' suppress output
$ cmp -s file1.txt file2.txtCode language: PHP (php)
‘comm’ command in Linux with examples
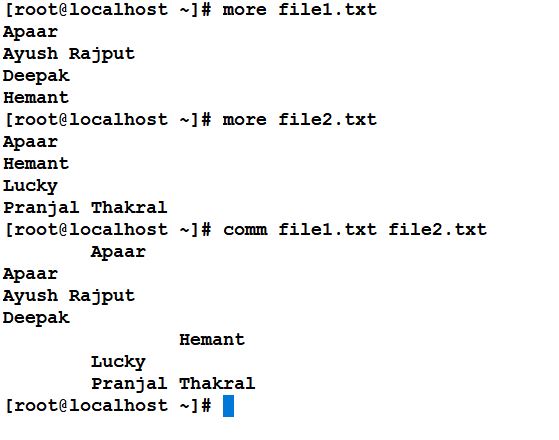
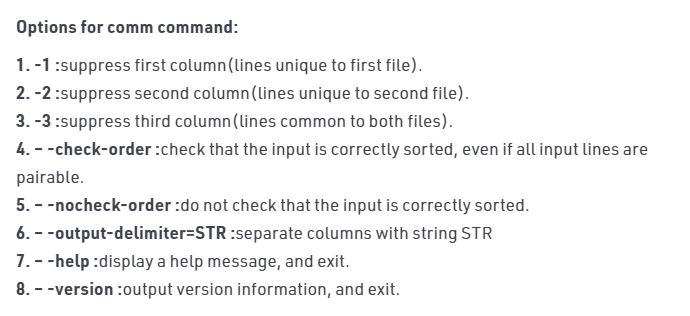
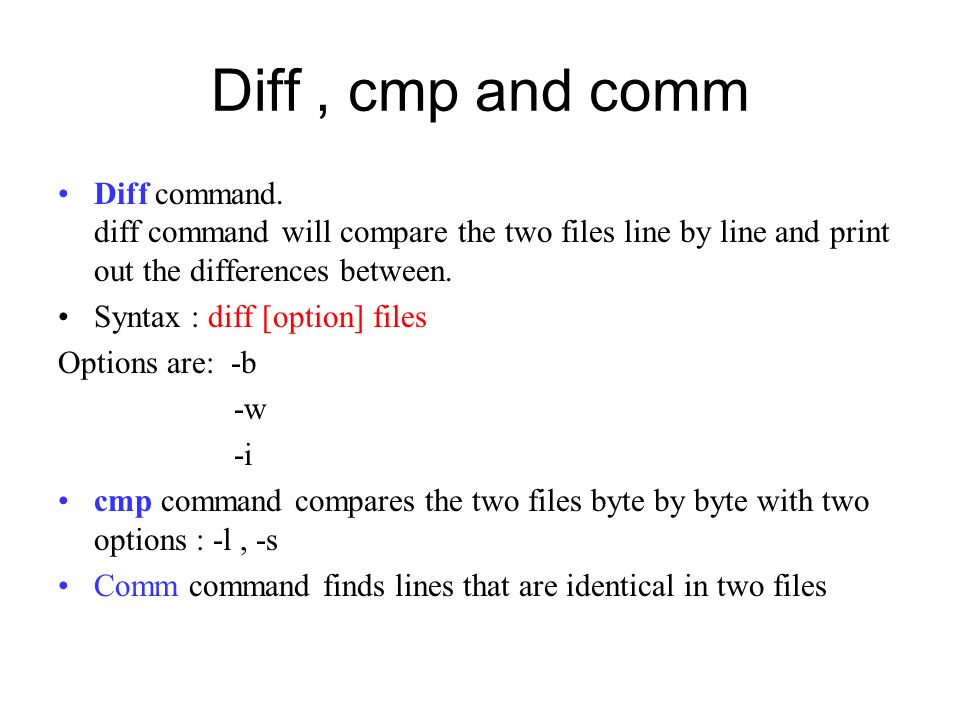
comm compare two sorted files line by line and write to standard output; the lines that are common and the lines that are unique.
‘stat’ command in Linux with examples
stat is a command-line utility that displays detailed information about given files or file systems.

# Check Linux File Status. The easiest way to use stat is to provide it a file as an argument. The following command will display the size, blocks, IO blocks, file type, inode value, number of links and much more information about the file /var/log/syslog, as shown in the screenshot:
$ stat /var/log/syslog

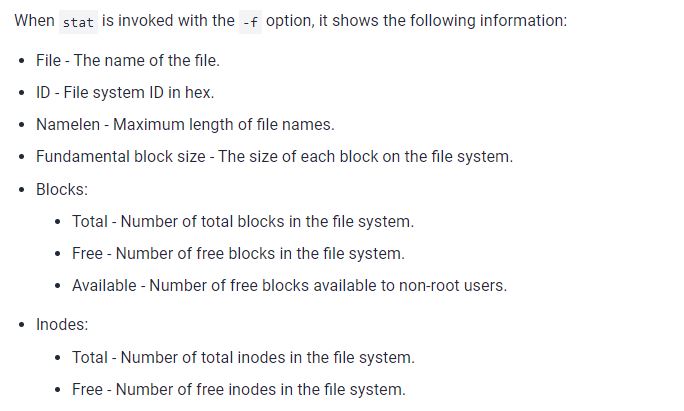
# Check File System Status. In the previous example, stat command treated the input file as a normal file, however, to display file system status instead of file status, use the -f option.
$ stat -f /var/log/syslog

# You can also provide a directory/filesystem as an argument as shown.
$ stat -f /

# Since Linux supports links (symbolic and hard links), certain files may have one or more links, or they could even exist in a filesystem. To enable stat to follow links, use the -L flag as shown.
$ stat -L /

# Print Information in Terse Form. The -t option can be used to print the information in terse form.
$ stat -t /var/log/syslog
Code language: PHP (php)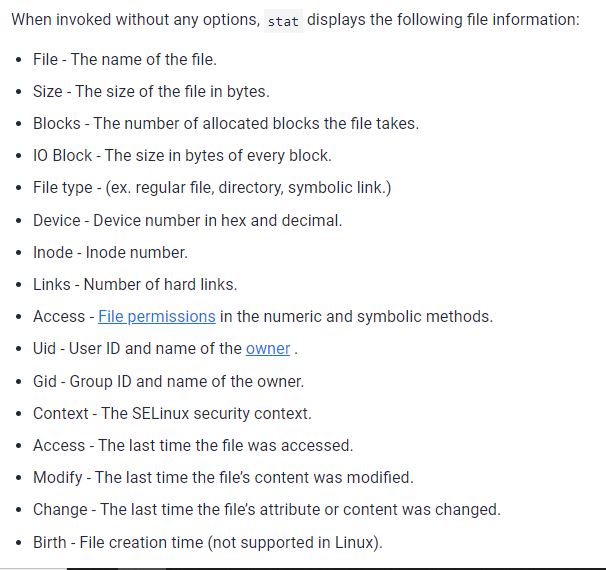
Customizing the environment
# set – set statemtent display a complete list of all environment variable
# PATH =$PATH:/usr/xpg4/bin – Adding new value to old values
# PS1 =”C> “ – To Change the prompt
# PS1=’[$PWD] ‘ – To Change the prompt to pwd
# alias cp=”cp –I” – To Set the alias in bash
# history – To See the history
# IFS – Field Separators for commands and arguments
# !! – Repeat Previous commands
# !2 – Repeat commands 2 from history output
# !-2 – Execute the commands prior to previous one
# !v – Execture very last commands beginning withg v
# $_ – Using last arugement of previous commands
# mkdir raj
# cd $_Code language: PHP (php)I’m a DevOps/SRE/DevSecOps/Cloud Expert passionate about sharing knowledge and experiences. I have worked at Cotocus. I share tech blog at DevOps School, travel stories at Holiday Landmark, stock market tips at Stocks Mantra, health and fitness guidance at My Medic Plus, product reviews at TrueReviewNow , and SEO strategies at Wizbrand.
Do you want to learn Quantum Computing?
Please find my social handles as below;
Rajesh Kumar Personal Website
Rajesh Kumar at YOUTUBE
Rajesh Kumar at INSTAGRAM
Rajesh Kumar at X
Rajesh Kumar at FACEBOOK
Rajesh Kumar at LINKEDIN
Rajesh Kumar at WIZBRAND
Find Trusted Cardiac Hospitals
Compare heart hospitals by city and services — all in one place.
Explore Hospitals
