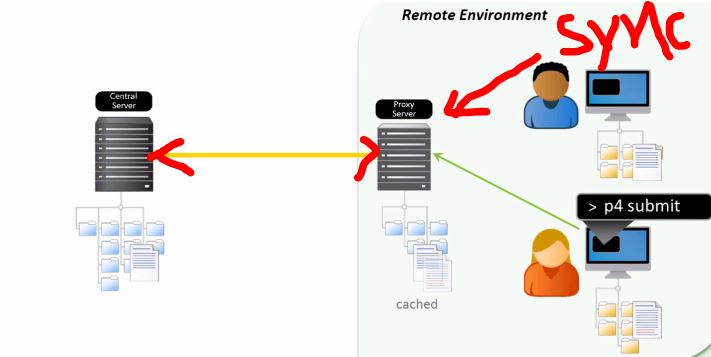

Perforce aka Helix is built to handle distributed development in a wide range of network topologies. Perforce Proxy (P4P) provides fast, local access to versioned files at remote sites. With P4P, remote users can quickly access versioned content.
The Perforce Proxy aka Helix Proxy is a free caching server that can be deployed to accelerate file access operations between locations with limited network resources. When a user performs a sync to their local machine, or a submit to the Perforce server, the proxy caches the repository files at the remote office so they don’t have to be transferred to and from the central server on every operation.
P4P stores file revisions only when one of its users submits a new revision to the depot or requests an existing revision from the depot. That is, file revisions are not prefetched. Performance gains from P4P occur only after file revisions are cached.
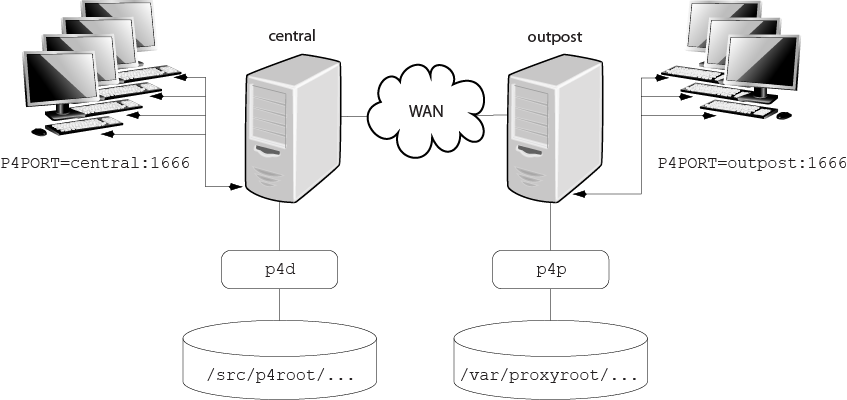
In this above image, file revisions requested by users at a remote development site are fetched first from a central Helix Core server (p4d running on central) and transferred over a relatively slow WAN. Subsequent requests for that same revision, however, are delivered from the Helix Proxy, (p4p running on outpost), over the remote development site’s LAN, reducing both network traffic across the WAN and CPU load on the central server.s
Downloading and Installing The Perforce Proxy aka Helix Proxy p4p
- Download the p4p executable to the machine on which you want to run the proxy.
- Select a directory on this machine (P4PCACHE) in which to cache file revisions.
- Select a port (P4PORT) on which p4p will listen for requests from Perforce applications.
- Select the target Perforce server (P4TARGET) for which this proxy will cache.
Running P4P The Perforce Proxy aka Helix Proxy
[code]$ p4p -p tcp64:[::]:1999 -t central:1666 -r /var/proxyroot[/code]
Verifying P4P The Perforce Proxy aka Helix Proxy
[code]$ export P4PORT=tcp:outpost:1999
$ p4 info[/code]
Reference
https://www.perforce.com/perforce/doc.current/manuals/p4dist/Content/P4Dist/chapter.proxy.html
Step 1
| # Add the Perforce packaging key to your APT keyring: | |
| $ wget -qO - https://package.perforce.com/perforce.pubkey | gpg --dearmor | sudo tee /usr/share/keyrings/perforce.gpg | |
| # If you are required to use an older OS that does not support the above method, you can use: | |
| $ wget -qO - https://package.perforce.com/perforce.pubkey | sudo apt-key add - | |
| # Create a file called /etc/apt/sources.list.d/perforce.list with the following line: | |
| deb [signed-by=/usr/share/keyrings/perforce.gpg] https://package.perforce.com/apt/{os} {distro} release | |
| # Add Perforce's repository to your APT configuration: | |
| Create a file called /etc/apt/sources.list.d/perforce.list with the following line: | |
| Where {os} is replaced with ubuntu, and {distro} is replaced by one of the following: precise, trusty, xenial, bionic, or focal | |
| $ deb [signed-by=/usr/share/keyrings/perforce.gpg] https://package.perforce.com/apt/{os} {distro} release | |
| # Run apt-get update | |
| $ apt-get update | |
| # Install P4vD Helix Core | |
| $ apt-get install helix-p4dctl | |
| $ apt-get install helix-proxy | |
| $ apt-get install helix-cli | |
| # $ apt-get install helix-p4d | |
| # $ apt-get install helix-broker | |
| # https://www.perforce.com/manuals/p4sag/Content/P4SAG/install.linux.packages.install.html |
Step 2
sudo -u perforce sh -c "cp /etc/perforce/p4dctl.conf.d/p4p.template /etc/perforce/p4dctl.conf.d/p4p-master.conf; mkdir /opt/perforce/servers/p4p-master"Step 3
vi /etc/perforce/p4dctl.conf.d/p4p-master.conf

#-------------------------------------------------------------------------------
# Template p4dctl configuration file for Helix Core Proxy
#-------------------------------------------------------------------------------

p4p p4p-master
{
    Owner       =       perforce
    Execute     =       /usr/sbin/p4p
    Umask       =       077

    Environment
    {
        P4PCACHE=/opt/perforce/servers/p4p-master/
        P4TARGET=ssl:1666
        P4PORT=1667
        PATH=/bin:/usr/bin:/usr/local/bin
    }
}
Step 4 – Copy Certificates in Proxy Server
$ cp /opt/perforce/servers/master/root/ssl/certificate.txt /opt/perforce/servers/p4p-master/ip-172-31-25-99Step 4 – Start P4p
p4dctl stop p4p-master
p4dctl start p4p-master
p4dctl list
p4dctl restart p4p-masterI’m a DevOps/SRE/DevSecOps/Cloud Expert passionate about sharing knowledge and experiences. I am working at Cotocus. I blog tech insights at DevOps School, travel stories at Holiday Landmark, stock market tips at Stocks Mantra, health and fitness guidance at My Medic Plus, product reviews at I reviewed , and SEO strategies at Wizbrand.
Please find my social handles as below;
Rajesh Kumar Personal Website
Rajesh Kumar at YOUTUBE
Rajesh Kumar at INSTAGRAM
Rajesh Kumar at X
Rajesh Kumar at FACEBOOK
Rajesh Kumar at LINKEDIN
Rajesh Kumar at PINTEREST
Rajesh Kumar at QUORA
Rajesh Kumar at WIZBRAND

 Starting: 1st of Every Month
  +91 8409492687
  Contact@DevOpsSchool.com

 by
by 