
 Starting: 1st of Every Month
  +91 8409492687
  Contact@DevOpsSchool.com
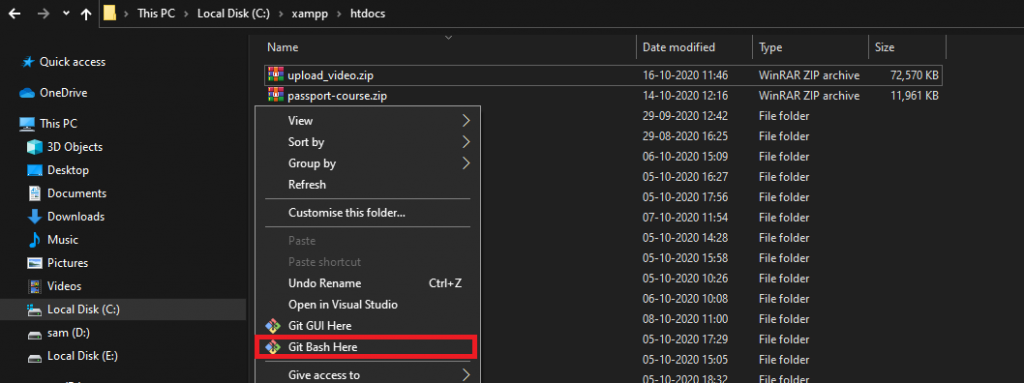
Step-1 open terminal as a git base here in C:\xampp\htdocs look a pic
After click on git base Here it will be open like this look a pic.

After an open the terminal, you have to paste this code in the terminal below this code for making laravel project.and press enter to run this project. It will take a few minutes for installing this project.
composer create-project --prefer-dist laravel/laravel ImageUploadMailSend "5.8.*"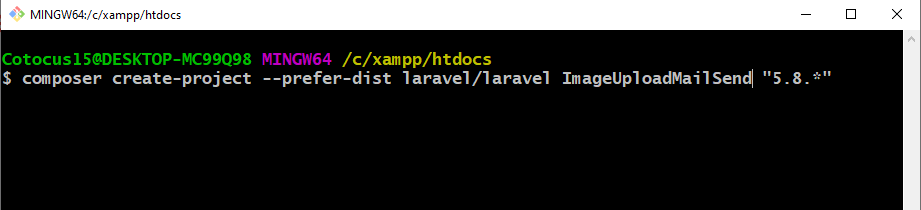
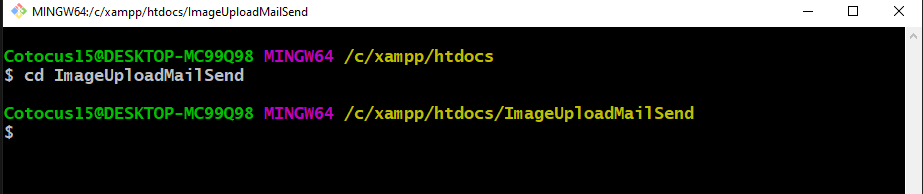
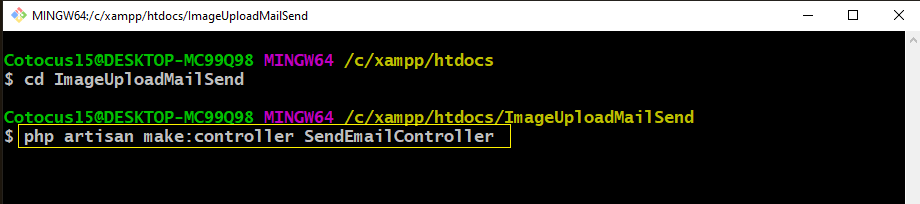
Step-2 After installed the project type in your terminal for inter the project cd ImageUploadMailSend
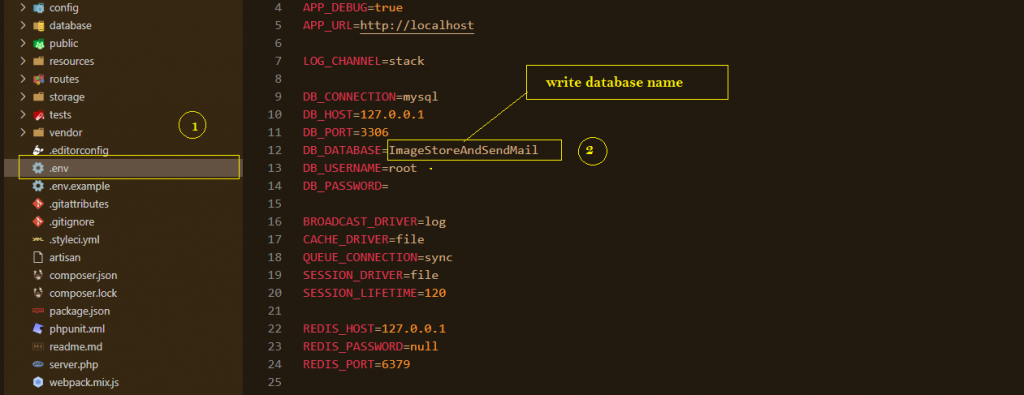
Step-3 Open this project in any code editor like that notepad++,visual code. and go to .env file and write database name.
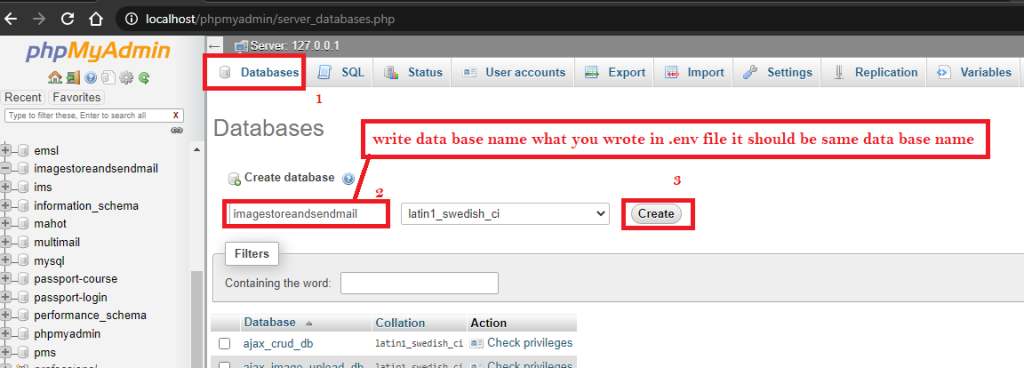
Step-4 make database in follow this step.
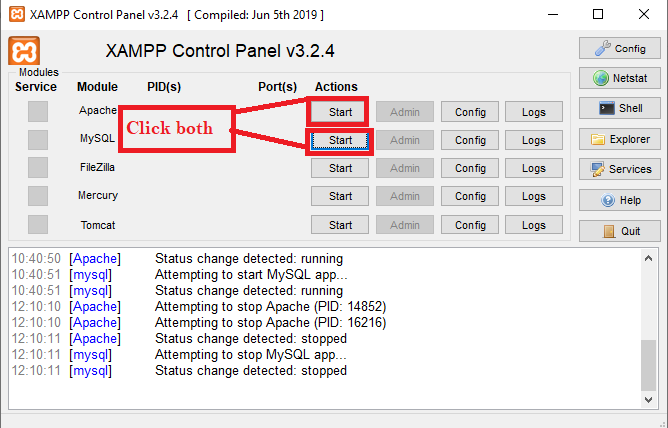
Step:5 After start Apache and MySql ,open browser write this url http://localhost/phpmyadmin/server_databases.php then make database anme.
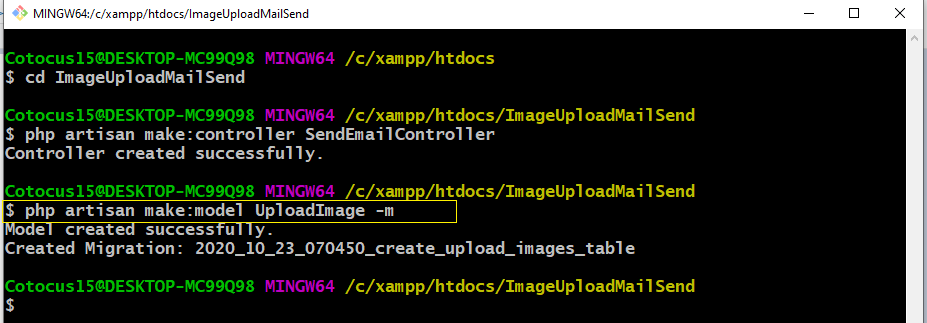
Step-6 mkae a controller.
php artisan make:controller SendEmailController
Step:7 make a model
php artisan make:model UploadImage -m
Step:8 write a column name in this table name, email, image. database\migrations\2020_10_23_070450_create_upload_images_table.php

Step-9 Then migrate table
go to terminal and write this keyword for migrate
php artisan migrate

Step:10 Then make a view page send_email.blade.php
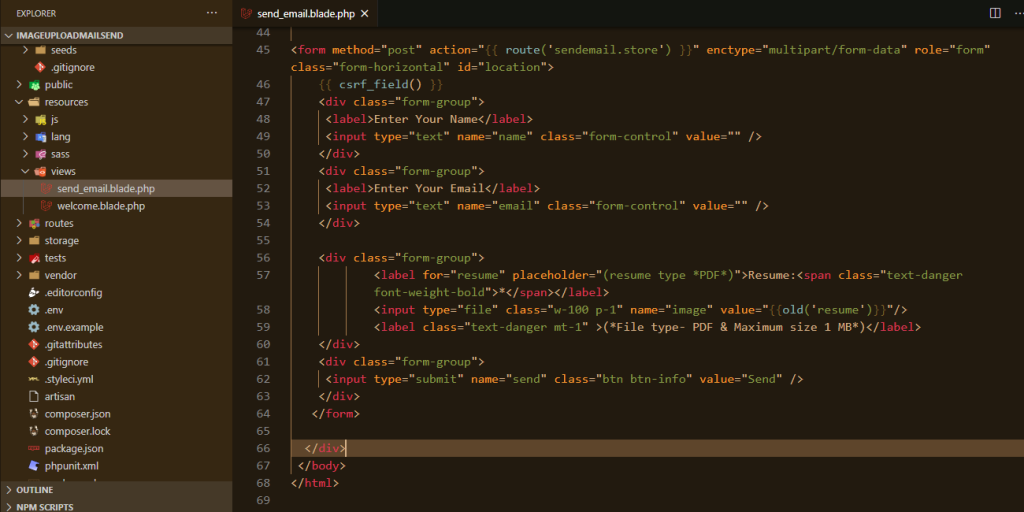
This is code of send_email.blade.php
| <!DOCTYPE html> | |
| <html> | |
| <head> | |
| <title> send a mail with Attachment </title> | |
| <script src="https://ajax.googleapis.com/ajax/libs/jquery/3.1.0/jquery.min.js"></script> | |
| <link rel="stylesheet" href="https://maxcdn.bootstrapcdn.com/bootstrap/3.3.6/css/bootstrap.min.css" /> | |
| <script src="https://maxcdn.bootstrapcdn.com/bootstrap/3.3.7/js/bootstrap.min.js"></script> | |
| <style type="text/css"> | |
| .box{ | |
| width:600px; | |
| margin:0 auto; | |
| border:1px solid #ccc; | |
| } | |
| .has-error | |
| { | |
| border-color:#cc0000; | |
| background-color:#ffff99; | |
| } | |
| </style> | |
| </head> | |
| <body> | |
| <br /> | |
| <br /> | |
| <br /> | |
| <div class="container box"> | |
| <h3 align="center">send a mail with Attachment using laravel 5.8</h3><br /> | |
| @if (count($errors) > 0) | |
| <div class="alert alert-danger"> | |
| <button type="button" class="close" data-dismiss="alert">×</button> | |
| <ul> | |
| @foreach ($errors->all() as $error) | |
| <li>{{ $error }}</li> | |
| @endforeach | |
| </ul> | |
| </div> | |
| @endif | |
| @if ($message = Session::get('success')) | |
| <div class="alert alert-success alert-block"> | |
| <button type="button" class="close" data-dismiss="alert">×</button> | |
| <strong>{{ $message }}</strong> | |
| </div> | |
| @endif | |
| <form method="post" action="{{ route('sendemail.store') }}" enctype="multipart/form-data" role="form" class="form-horizontal" id="location"> | |
| {{ csrf_field() }} | |
| <div class="form-group"> | |
| <label>Enter Your Name</label> | |
| <input type="text" name="name" class="form-control" value="" /> | |
| </div> | |
| <div class="form-group"> | |
| <label>Enter Your Email</label> | |
| <input type="text" name="email" class="form-control" value="" /> | |
| </div> | |
| <div class="form-group"> | |
| <label for="resume" placeholder="(resume type *PDF*)">Resume:<span class="text-danger font-weight-bold">*</span></label> | |
| <input type="file" class="w-100 p-1" name="image" value="{{old('resume')}}"/> | |
| <label class="text-danger mt-1" >(*File type- PDF & Maximum size 1 MB*)</label> | |
| </div> | |
| <div class="form-group"> | |
| <input type="submit" name="send" class="btn btn-info" value="Send" /> | |
| </div> | |
| </form> | |
| </div> | |
| </body> | |
| </html> |
 by
by Step:11 make one blade page resources/view/dynamic_email_template.blade.php
| <p style="margin-left:10%;">First Name - <b>{{ $data['name'] }} </b></p> | |
| <p style="margin-left:10%;">last Name - <b>{{ $data['email'] }} </b></p> | |
| <p>It would be appriciative, if you gone through this feedback.</p> |
Step-12. make route go to and write this code in web.php
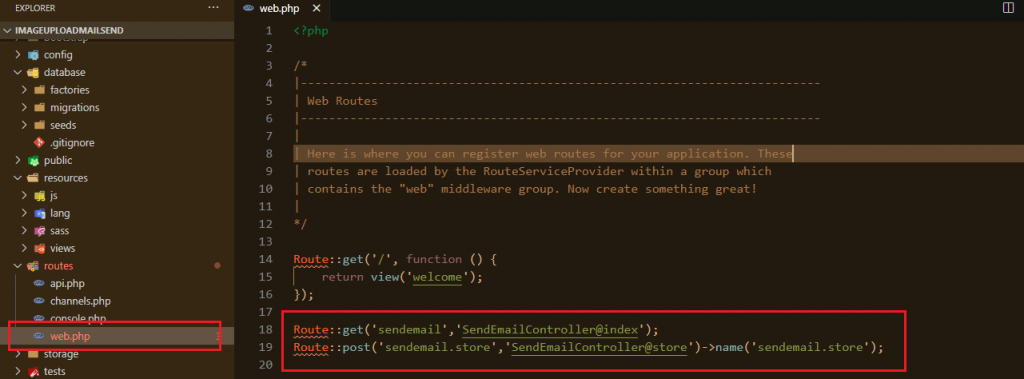
Step-13 web.php
| Route::get('sendemail','SendEmailController@index'); | |
| Route::post('sendemail.store','SendEmailController@store')->name('sendemail.store'); |
Step-14 go to controller and call model class.
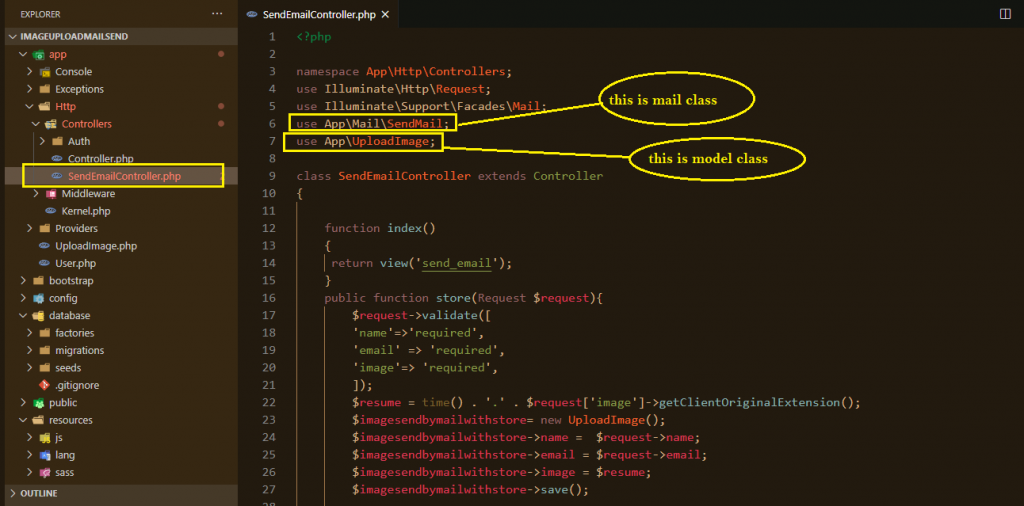
| <?php | |
| namespace App\Http\Controllers; | |
| use Illuminate\Http\Request; | |
| use Illuminate\Support\Facades\Mail; | |
| use App\Mail\SendMail; | |
| use App\UploadImage; | |
| class SendEmailController extends Controller | |
| { | |
| function index() | |
| { | |
| return view('send_email'); | |
| } | |
| public function store(Request $request){ | |
| $request->validate([ | |
| 'name'=>'required', | |
| 'email' => 'required', | |
| 'image'=> 'required', | |
| ]); | |
| $resume = time() . '.' . $request['image']->getClientOriginalExtension(); | |
| $imagesendbymailwithstore= new UploadImage(); | |
| $imagesendbymailwithstore->name = $request->name; | |
| $imagesendbymailwithstore->email = $request->email; | |
| $imagesendbymailwithstore->image = $resume; | |
| $imagesendbymailwithstore->save(); | |
| // for mailling function working | |
| $imagesendbymailwithstore = array( | |
| 'name' => $request->name, | |
| 'email' => $request->email, | |
| 'image' => $request->image, | |
| ); | |
| Mail::to($imagesendbymailwithstore['email'])->send(new SendMail($imagesendbymailwithstore)); | |
| $request['image']->move(base_path() . '/storage/app/public', $resume); | |
| return back()->with('success', 'Thanks for contacting us!'); | |
| } | |
| } |
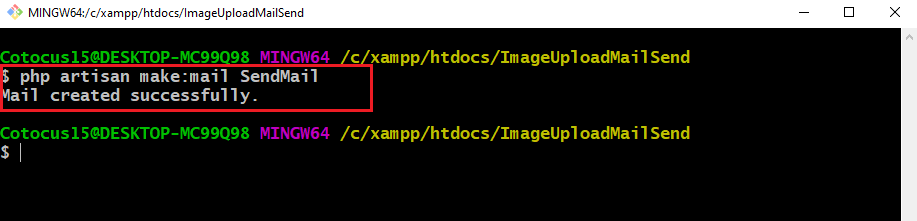
Step:15 make a mail
php artisan make:mail SendMail
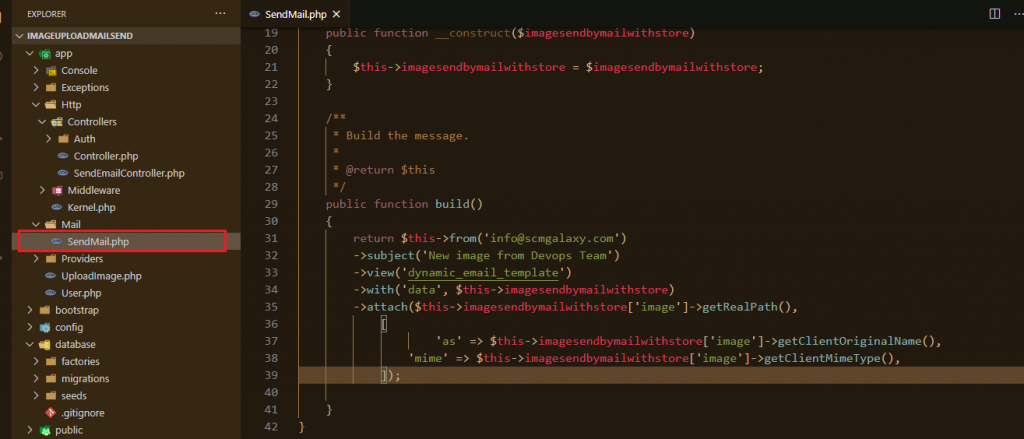
Step-16 go to Mail/Sendmail then write this code. it will work for send mail.
| <?php | |
| namespace App\Mail; | |
| use Illuminate\Bus\Queueable; | |
| use Illuminate\Mail\Mailable; | |
| use Illuminate\Queue\SerializesModels; | |
| use Illuminate\Contracts\Queue\ShouldQueue; | |
| class SendMail extends Mailable | |
| { | |
| use Queueable, SerializesModels; | |
| public $imagesendbymailwithstore; | |
| /** | |
| * Create a new message instance. | |
| * | |
| * @return void | |
| */ | |
| public function __construct($imagesendbymailwithstore) | |
| { | |
| $this->imagesendbymailwithstore = $imagesendbymailwithstore; | |
| } | |
| /** | |
| * Build the message. | |
| * | |
| * @return $this | |
| */ | |
| public function build() | |
| { | |
| return $this->from('info@scmgalaxy.com') | |
| ->subject('New image from Devops Team') | |
| ->view('dynamic_email_template') | |
| ->with('data', $this->imagesendbymailwithstore) | |
| ->attach($this->imagesendbymailwithstore['image']->getRealPath(), | |
| [ | |
| 'as' => $this->imagesendbymailwithstore['image']->getClientOriginalName(), | |
| 'mime' => $this->imagesendbymailwithstore['image']->getClientMimeType(), | |
| ]); | |
| } | |
| } |
Step-17 open mailtrap and make a account,
https://mailtrap.io/signin
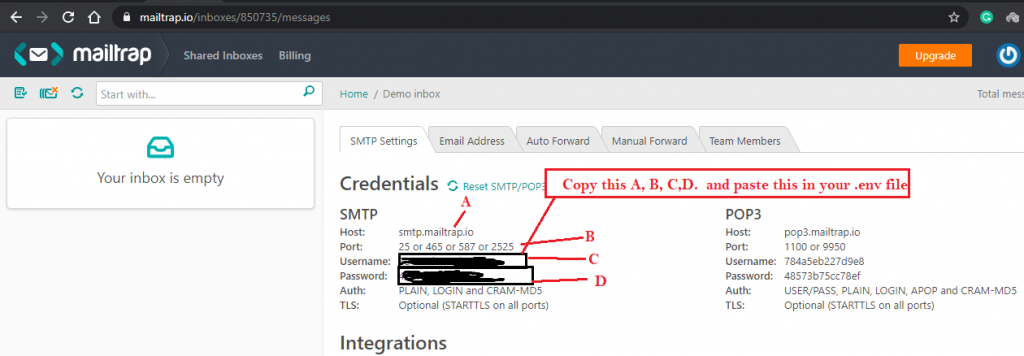
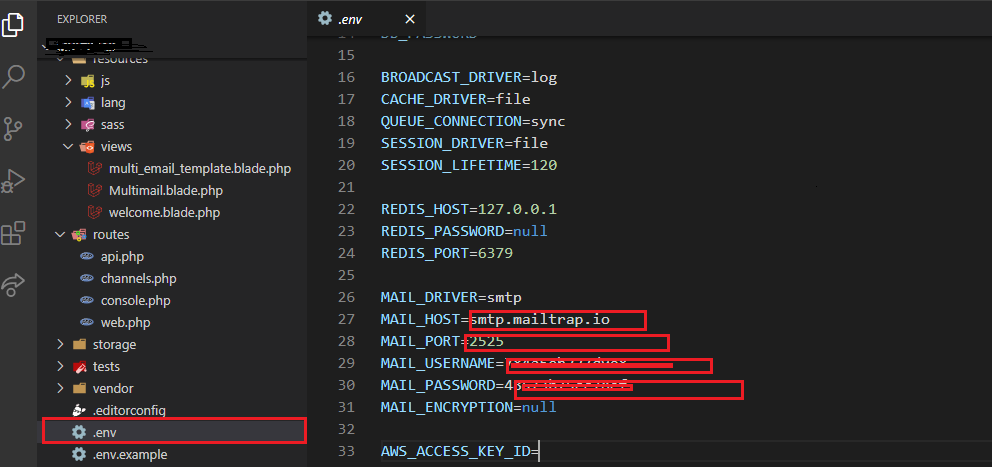
Step-18 Then Configure .env file
Step-19– After run this command in the terminal
php artisan c:cache
Then
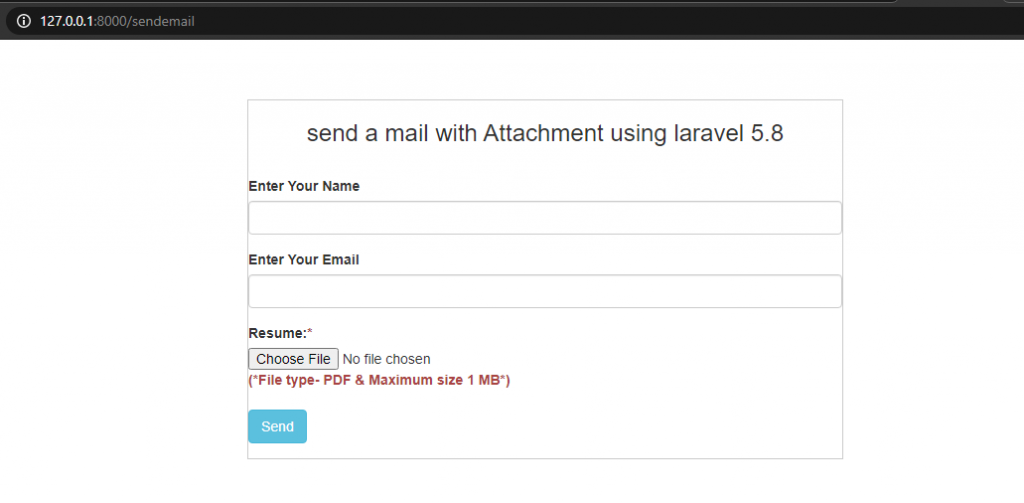
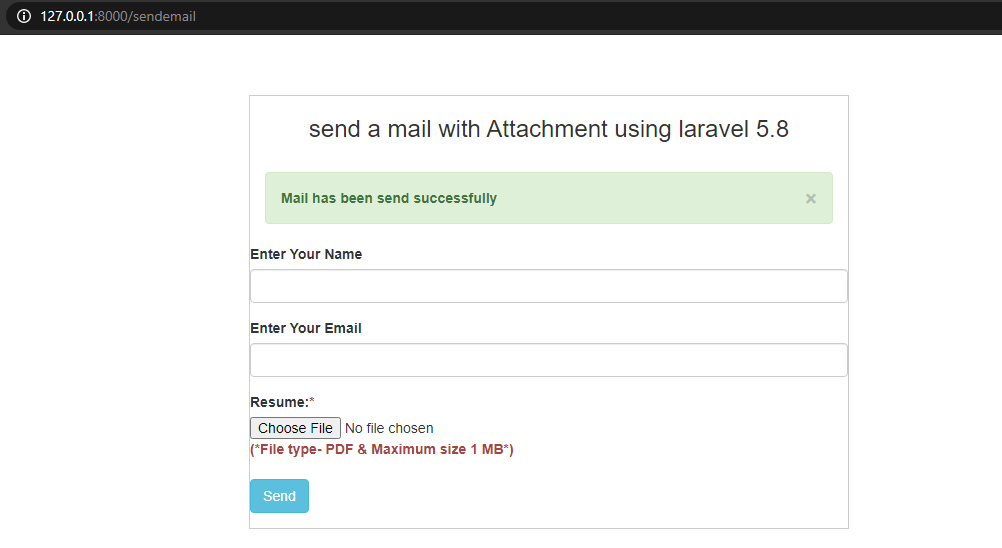
php artisan serve after serve you can run run this url in your broswer
http://127.0.0.1:8000/sendemail
MotoShare.in is your go-to platform for adventure and exploration. Rent premium bikes for epic journeys or simple scooters for your daily errands—all with the MotoShare.in advantage of affordability and ease.
