What is AngularJS?

AngularJS is an open-source JavaScript-based front-end web application framework developed by Google. It is designed to make both the development and testing of such applications easier by providing a framework for client-side (browser) MVC (Model-View-Controller) and MVVM (Model-View-ViewModel) architectures, along with components commonly used in rich Internet applications.
Key Features of AngularJS:
- Two-Way Data Binding: AngularJS provides two-way data binding, meaning changes in the user interface (View) instantly update the application data (Model), and vice versa. This eliminates the need for manual DOM manipulation.
- Dependency Injection: AngularJS has a built-in dependency injection system that helps manage components and services, making it easier to develop, test, and maintain code.
- Modular Architecture: Applications can be organized into modular components, making it easier to develop, test, and maintain large-scale applications.
- Templates: AngularJS uses HTML templates enhanced with additional attributes and expressions, making it easy to create dynamic views.
- Directives: Directives are markers on DOM elements that tell AngularJS to attach specific behavior to them. They extend HTML with new attributes and elements.
- Controllers: Controllers are JavaScript functions that handle the business logic of an application. They manage the data and behavior of a view.
- Services: Services are reusable components that can be injected into controllers. They provide a way to organize and share code across the application.
- Filters: Filters are used for formatting data before it is displayed to the user. They can be used in expressions within templates.
- Routing: AngularJS provides a client-side routing mechanism, allowing developers to create single-page applications (SPAs) with multiple views.
- Testing Support: AngularJS is designed with testability in mind. It comes with its testing framework (Jasmine) and tools for writing unit tests and end-to-end tests.
What is top use cases of AngularJS?
- Single Page Applications (SPAs):
- AngularJS is particularly well-suited for building SPAs, where a single HTML page is dynamically updated as the user interacts with the application.
- Dynamic Web Applications:
- Web applications that require dynamic content updates and real-time interaction benefit from AngularJS’s two-way data binding and modular architecture.
- Form-Based Applications:
- Applications with complex forms and data input can leverage AngularJS’s form-handling capabilities, validation, and dynamic form generation.
- Enterprise Applications:
- Large-scale enterprise applications with modular components and a need for maintainability benefit from AngularJS’s modular architecture and dependency injection.
- Content Management Systems (CMS):
- AngularJS is suitable for building CMS interfaces that require dynamic content updates and seamless user interactions.
- E-commerce Applications:
- E-commerce sites often require dynamic product catalogs, real-time updates, and interactive user interfaces, making AngularJS a good fit.
- Dashboards and Analytics:
- Applications that involve data visualization, dashboards, and analytics can benefit from AngularJS’s ability to handle dynamic views and data binding.
- Collaborative Tools:
- Real-time collaboration tools, where multiple users interact with the same data simultaneously, can leverage AngularJS for its real-time data binding features.
- Customer Relationship Management (CRM) Systems:
- CRM applications often involve complex user interfaces, forms, and dynamic data updates, making AngularJS a suitable choice.
- Interactive Forms and Surveys:
- Applications that involve complex forms, surveys, and user input can utilize AngularJS for its form-handling capabilities and dynamic updates.
While AngularJS has been widely used in the past, it’s essential to note that AngularJS (version 1.x) has reached its end of life, and the Angular team recommends migrating to the newer Angular framework (version 2 and above) for ongoing development projects. The newer Angular framework builds on the concepts introduced in AngularJS but provides improved performance, modularity, and features.
What are feature of AngularJS?

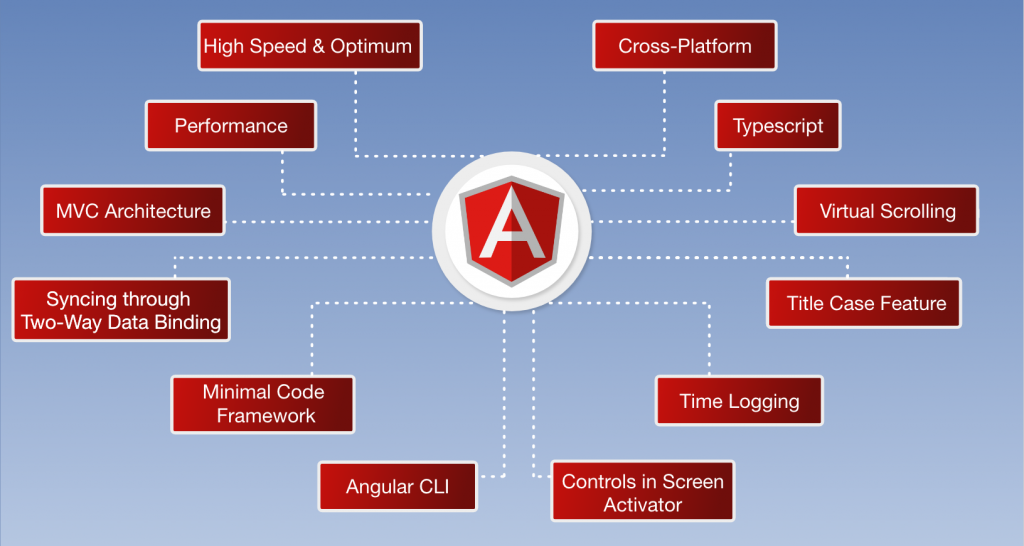
Features of AngularJS:
- Two-Way Data Binding:
- AngularJS features two-way data binding, meaning changes in the model automatically update the view, and vice versa. This simplifies the synchronization of data between the model and the view.
- Directives:
- Directives are markers in the DOM that tell AngularJS to attach specific behaviors to an HTML element or to transform the DOM in a specific way. Examples include
ng-model,ng-bind, andng-repeat.
- Directives are markers in the DOM that tell AngularJS to attach specific behaviors to an HTML element or to transform the DOM in a specific way. Examples include
- Dependency Injection:
- AngularJS has a built-in dependency injection system that helps manage components and services, making it easier to develop, test, and maintain code.
- Modular Architecture:
- AngularJS encourages a modular approach to application development. Code can be organized into reusable modules, making it more maintainable and scalable.
- Templates:
- AngularJS uses HTML templates enhanced with additional attributes and expressions, making it easy to create dynamic views.
- Controllers:
- Controllers in AngularJS are JavaScript functions that handle the business logic of an application. They manage the data and behavior of a view.
- Services:
- Services in AngularJS are singletons that carry out specific tasks and can be injected into controllers, directives, and other services.
- Routing:
- AngularJS provides a client-side routing mechanism, allowing developers to create single-page applications (SPAs) with multiple views.
- Filters:
- Filters in AngularJS allow the transformation of data before it is presented to the user. They can be used in expressions within templates.
- Testing Support:
- AngularJS is designed with testability in mind. It comes with its testing framework (Jasmine) and tools for writing unit tests and end-to-end tests.
- Scope:
- The scope is an object that applies to the application model. It acts as a bridge between the controller and the view, facilitating data binding.
- Forms and Validation:
- AngularJS simplifies the handling of forms and provides built-in validation mechanisms, making it easier to manage user input.
- HTTP Service:
- AngularJS includes an HTTP service for making AJAX requests to retrieve or send data to a server.
- Custom Directives:
- Developers can create custom directives to encapsulate and reuse UI components and behaviors.
- Animation Support:
- AngularJS provides animation support to create smooth transitions and effects in the UI.
What is the workflow of AngularJS?
Following is a workflow of AngularJS:
- Set Up AngularJS:
- Include the AngularJS script in your HTML file or use a package manager like npm to install it. Define the main module of your application.
   <script src="https://ajax.googleapis.com/ajax/libs/angularjs/1.8.2/angular.min.js"></script>
   <script>
     var app = angular.module('myApp', []);
</script>- Create Controllers:
- Define controllers to manage the application logic and bind them to specific views.
   <div ng-controller="myCtrl">
     {{ message }}
   </div>
app.controller('myCtrl', function($scope) {
$scope.message = 'Hello, AngularJS!';
});- Use Two-Way Data Binding:
- Leverage two-way data binding to automatically update the view when the model changes.
   <input ng-model="name" placeholder="Enter your name">
<p>Hello, {{ name }}!</p>- Work with Directives:
- Use built-in directives or create custom directives to enhance HTML and provide additional behavior.
<div ng-show="isVisible">This is visible</div>- Define Services:
- Create services to encapsulate business logic or handle data fetching.
   app.service('myService', function() {
     this.getData = function() {
       // Fetch data logic
     };
});- Implement Routing:
- Set up client-side routing to navigate between different views in a single-page application.
   app.config(function($routeProvider) {
     $routeProvider
       .when('/', {
         templateUrl: 'home.html',
         controller: 'HomeController'
       })
       .when('/about', {
         templateUrl: 'about.html',
         controller: 'AboutController'
       });
});- Handle Forms and Validation:
- Utilize AngularJS forms and validation features to manage user input.
   <form ng-submit="submitForm()">
     <input type="text" ng-model="username" required>
     <button type="submit">Submit</button>
   </form>
app.controller('myCtrl', function($scope) {
$scope.submitForm = function() {
// Form submission logic
};
});- Integrate HTTP Service:
- Use the AngularJS HTTP service to make AJAX requests to a server.
   app.controller('myCtrl', function($scope, $http) {
     $http.get('/api/data')
       .then(function(response) {
         $scope.data = response.data;
       });
});- Implement Animations:
- Add animations to create engaging and visually appealing user interfaces.
<div ng-show="isVisible" class="animate-show">This is visible</div> .animate-show {
transition: all 0.5s ease-in-out;
}- Testing:
- Write unit tests and end-to-end tests using the testing framework (e.g., Jasmine) provided by AngularJS.
   describe('myCtrl', function() {
     it('should set message correctly', inject(function($controller) {
       var $scope = {};
       var controller = $controller('myCtrl', { $scope: $scope });
       expect($scope.message).toEqual('Hello, AngularJS!');
     }));
});- Build and Deployment:
- Optimize and minify code for production. Deploy the application to a server.
The workflow of AngularJS involves setting up the application, defining controllers and services, using directives for enhanced functionality, implementing routing for navigation, and integrating various features to create a dynamic and responsive web application. The development process is modular and follows a declarative approach. Note that while AngularJS was popular, its successor, Angular (Angular 2 and above), has become more widely adopted for modern web development.
How AngularJS Works & Architecture?

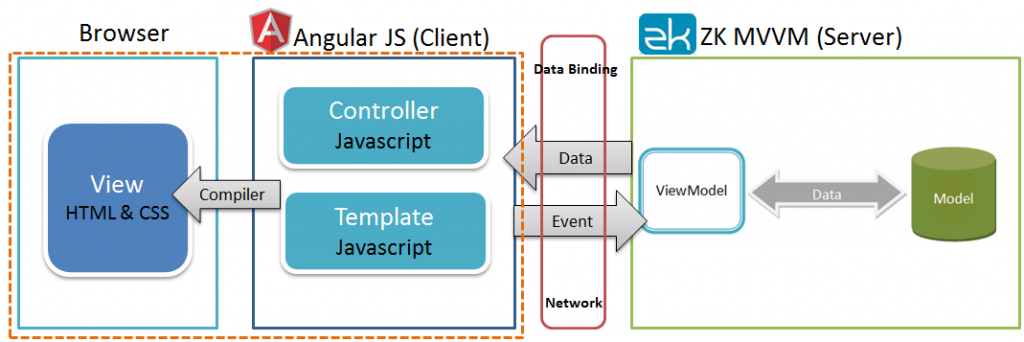
It is based on the Model-View-Controller (MVC) architecture, which separates the application’s concerns into distinct layers, making it easier to develop, maintain, and test.
Key Components of AngularJS Architecture:
- Model: The model represents the data of the application. It is responsible for storing and managing the data, and it is typically implemented using plain JavaScript objects or JSON.
- Controller: The controller performs as the intermediary between the view and the model. It handles user interactions, updates the model, and triggers changes in the view.
- View: The view depicts the user interface of the application. It is responsible for displaying the data and handling user input. AngularJS uses a templating language, such as HTML or Jade, to define the view.
Data Binding in AngularJS:
AngularJS provides a powerful data binding mechanism that automatically synchronizes the data between the model and the view. This means that whenever the model changes, the view is automatically updated to reflect the new data, and vice versa. This simplicity and flexibility make AngularJS a popular choice for web development.
Two-Way Data Binding:
AngularJS’s two-way data binding allows for seamless synchronization between the model and the view. Any changes made to the model are automatically reflected in the view, and vice versa. This simplifies data management and reduces the need for manual code updates.
Directives:
Directives are AngularJS’s custom HTML attributes that extend the functionality of HTML elements. They allow developers to add dynamic behavior to the view and encapsulate reusable code blocks.
Dependency Injection:
AngularJS utilizes dependency injection to manage dependencies between components. This promotes loose coupling, makes components easier to test, and simplifies code maintenance.
Routing and Navigation:
AngularJS provides a routing framework for managing navigation between different sections of the application. It allows developers to define routes and associate them with controllers and views.
Modules:
AngularJS supports modularity, enabling developers to organize and structure their code into reusable modules. This promotes code reusability and maintainability.
Testing and Debugging:
AngularJS provides tools and frameworks for unit testing and debugging, ensuring the quality and robustness of web applications.
AngularJS simplifies web development by providing a structured and organized framework for building dynamic web applications. Its MVC architecture, data binding, directives, dependency injection, routing, modules, and testing tools make it a powerful and versatile tool for web developers.
How to Install and Configure AngularJS?
Installing and configuring AngularJS involves setting up the development environment and integrating the framework into your project. Here’s a step-by-step guide for both Windows and macOS systems:
Installing AngularJS on Windows:
Prerequisites:
- Node.js: Install Node.js, which provides the necessary environment for running JavaScript applications. You can download Node.js from the official website
- NPM: NPM (Node Package Manager) comes bundled with Node.js. It’s used to install and manage JavaScript packages, including AngularJS.
Installation Steps:
- Open Command Prompt: Open the Command Prompt or Terminal window.
- Install AngularJS: Use the following command to install AngularJS globally:
npm install -g angular
- Verify Installation: To verify the installation, type the following command and press Enter:
ng version
This should display the installed AngularJS version.
Configuring AngularJS on Windows:
- Create a Project Directory: Create a directory for your AngularJS project.
- Navigate to Project Directory: Navigate to the project directory using the
cdcommand in the Command Prompt. - Create a New AngularJS Project: Use the following command to create a new AngularJS project:
ng new my-angularjs-project
Replace “my-angularjs-project” with the desired project name.
- Start the Development Server: Navigate into the newly created project directory and start the development server using the following command:
ng serve
This will start a local development server and open the AngularJS application in your default web browser.
Installing AngularJS on macOS:
Prerequisites:
- Homebrew: Install Homebrew, a package manager for macOS. You can follow the instructions on the official website
- Node.js: Once Homebrew is installed, use the following command to install Node.js:
brew install node
Installation Steps:
- Open Terminal: Open the Terminal application.
- Install AngularJS: Use the following command to install AngularJS globally:
npm install -g angular
- Verify Installation: To verify the installation, type the following command and press Enter:
ng version
This should display the installed AngularJS version.
Configuring AngularJS on macOS:
- Create a Project Directory: Create a directory for your AngularJS project.
- Navigate to Project Directory: Navigate to the project directory using the
cdcommand in the Terminal. - Create a New AngularJS Project: Use the following command to create a new AngularJS project:
ng new my-angularjs-project
Replace “my-angularjs-project” with the desired project name.
- Start the Development Server: Navigate into the newly created project directory and start the development server using the following command:
ng serve
This will start a local development server and open the AngularJS application in your default web browser.
Notes:
- If you encounter any installation or configuration issues, refer to the AngularJS documentation or contact the AngularJS community for assistance.
- AngularJS is a legacy framework, and its active support has ceased. Consider using newer and actively maintained JavaScript frameworks like Angular or React for modern web development projects.
Fundamental Tutorials of AngularJS: Getting started Step by Step

Following is a step-by-step fundamental tutorial of AngularJS, covering essential concepts and operations to get you started with this JavaScript framework:
Step 1: Setting Up the Development Environment
- Install Node.js: Begin by installing Node.js, which provides the runtime environment for executing JavaScript code. Download and install Node.js from the official website.
- Verify Node.js Installation: Open a command prompt or terminal and type
node -vto check if Node.js is installed correctly. - Install NPM: Next, install NPM (Node Package Manager), which is used to manage JavaScript packages, including AngularJS. Use the following command:
Bash
npm install -g npm
Step 2: Creating an AngularJS Application
- Create an AngularJS Project: Use the
ng newcommand to create a new AngularJS project structure. Open a terminal or command prompt and navigate to the directory where you want to generate the project. Then, type the following command:
Bash
ng new my-angularjs-app
Replace “my-angularjs-app” with the desired project name.
- Navigate into Project Directory: Navigate into the newly created project directory using the
cdcommand:
Bash
cd my-angularjs-app
- Start the Development Server: Start the local development server using the following command:
Bash
ng serve
This will start the server and open the AngularJS application in your default web browser.
Step 3: Exploring the AngularJS Project Structure
- Project Files: The project directory contains various files, including HTML templates, JavaScript files, CSS files, and configuration files.
- Index.html: The
index.htmlfile serves as the main entry point for the application. It includes references to AngularJS libraries and the main application module. - App.js: The
app.jsfile defines the main application module, which includes components, controllers, services, and other dependencies. - Controllers: Controllers handle user interactions, update the model, and trigger changes in the view. Each controller is represented by a JavaScript file.
- Templates: HTML templates define the view structure using directives and expressions.
Step 4: Data Binding and Expressions
- Model and Expressions: The model represents the application’s data, typically stored in JavaScript objects. Expressions are used to reference model data within HTML templates.
- Two-way Data Binding: AngularJS provides two-way data binding, automatically synchronizing data between the model and the view. Changes in the view update the model, and changes in the model update the view.
- Interpolation Expressions: Double curly braces
{{ expression }}are used for interpolation expressions, which directly insert model data into the HTML template.
Step 5: Directives
- Directives: Directives extend HTML attributes to add dynamic behavior and functionality to the view. They are defined using the
directive()function. - ng-model Directive: The
ng-modeldirective is used for two-way data binding, linking form input elements to model properties. - ng-controller Directive: The
ng-controllerdirective associates a controller with a specific part of the view, allowing the controller to access and modify the view.
Step 6: Running the AngularJS Application
- Open the Application: Open the URL http://localhost:4200 in your web browser. This should display the AngularJS application you created.
- Interact with the Application: Interact with the application’s elements, such as buttons or input fields, to observe the data binding and directive functionality.
- Explore the Source Code: Open the project files in a code editor to understand the structure and implementation of the application.
This step-by-step tutorial provides a fundamental introduction to AngularJS concepts and operations.
Say goodbye to the hassles of bike ownership! MotoShare.in offers affordable rentals, whether you need a scooter for errands, a bike for a road trip, or a reliable ride to explore new cities.

 Starting: 1st of Every Month
  +91 8409492687
  Contact@DevOpsSchool.com
