What is Confluent?

Confluent is a technology company founded by the creators of Apache Kafka, an open-source distributed streaming platform. Confluent provides a commercial platform based on Kafka that enhances its capabilities, making it easier for organizations to build, manage, and operate real-time data streaming applications at scale. Confluent Platform provides additional tools and features to simplify Kafka deployments, enable event-driven architectures, and facilitate data integration and processing in real-time.
Top 10 use cases of Confluent:
- Real-time Data Streaming: Ingest and process large volumes of data in real-time from various sources.
- Data Integration: Integrate data from different systems and databases, enabling data pipelines and ETL processes.
- Event-Driven Architectures: Build event-driven microservices and applications to respond to real-time events.
- Data Replication and Synchronization: Replicate and synchronize data between databases and data centers in real-time.
- Log Aggregation: Centralize and analyze logs from various applications and systems for monitoring and analysis.
- Stream Processing: Perform real-time data processing and analytics on streaming data.
- IoT Data Ingestion and Processing: Ingest and process data from Internet of Things (IoT) devices and sensors.
- Data Decoupling and Mediation: Decouple and mediate data flow between different applications and systems.
- Change Data Capture (CDC): Capture and propagate data changes from databases to downstream systems.
- Event Hub and Real-Time Analytics: Build real-time event hubs for processing and analyzing event data.
What are the feature of Confluent?

- Confluent Control Center: A web-based graphical user interface for managing and monitoring Kafka clusters.
- Schema Registry: Centralized schema management for Kafka topics, ensuring data compatibility and evolution.
- Kafka Connect: A framework for easily integrating Kafka with external systems for data import and export.
- Kafka Streams: A Java library for building real-time stream processing applications directly on Kafka.
- Multi-Datacenter Replication: Replicate data between Kafka clusters in different data centers.
- KSQL: A SQL-like language for querying and processing streaming data in Kafka.
- REST Proxy: Provides HTTP/REST interface for producing and consuming data from Kafka.
- Security and Authorization: Provides features for secure data transport and access control.
- Auto Data Balancing: Automatically balance data distribution across Kafka brokers for optimal performance.
- Monitoring and Alerts: Built-in monitoring and alerting capabilities for Kafka cluster health and performance.
How Confluent works and Architecture?

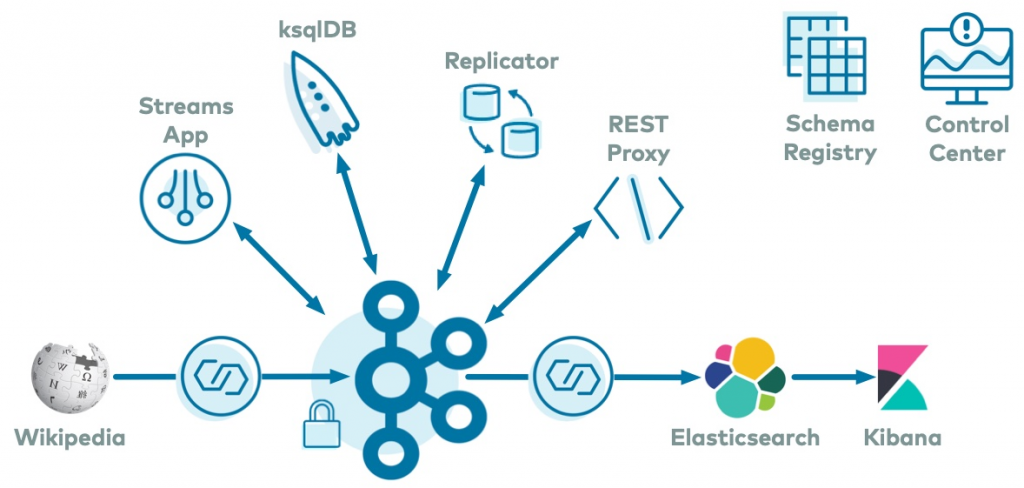
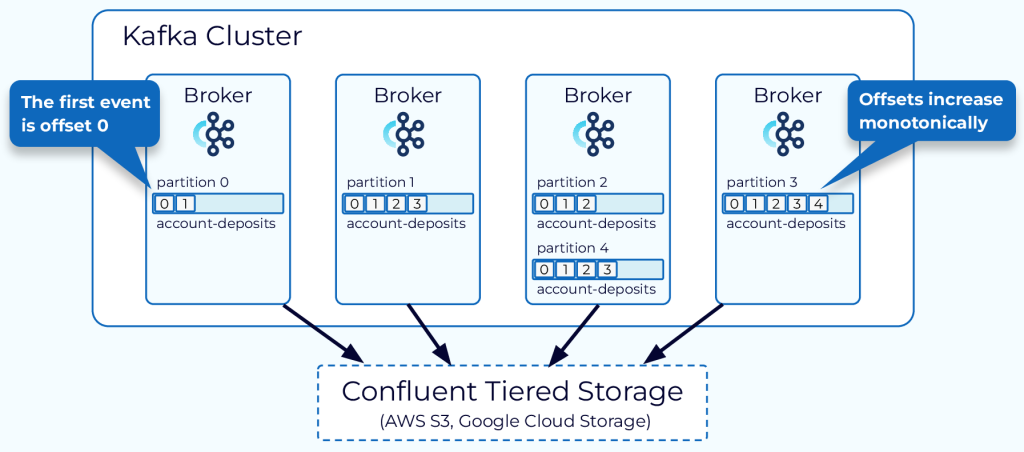
Confluent is built on top of Apache Kafka, so its architecture is closely aligned with Kafka’s distributed messaging system. At its core, Confluent includes a Kafka cluster that comprises multiple Kafka brokers, each running on separate nodes.
The key components of Confluent are:
- Kafka Brokers: These are responsible for handling the storage, replication, and distribution of data.
- Confluent Control Center: Provides a web-based GUI for cluster management, monitoring, and administration.
- Schema Registry: Centralizes the management and storage of data schemas for Kafka topics.
- Kafka Connect: Acts as a framework for integrating Kafka with external systems.
- KSQL: Allows you to process and analyze streaming data using SQL-like queries.
- REST Proxy: Provides a RESTful interface for interacting with Kafka.
How to Install Confluent?
To install Confluent, you can follow these general steps:
- Prerequisites: Ensure that you have Java installed on your system since Kafka requires it to run.
- Download Confluent: Go to the Confluent website (https://www.confluent.io/download/) and download the Confluent Platform.
- Extract the Archive: Extract the downloaded archive to a directory of your choice.
- Start ZooKeeper: Confluent relies on Apache ZooKeeper, so start ZooKeeper first:
./bin/zookeeper-server-start ./etc/kafka/zookeeper.properties- Start Kafka Brokers: Start the Kafka brokers next:
./bin/kafka-server-start ./etc/kafka/server.properties- Start Schema Registry, REST Proxy, and KSQL: If you need these components, start them as well:
   ./bin/schema-registry-start ./etc/schema-registry/schema-registry.properties
   ./bin/kafka-rest-start ./etc/kafka-rest/kafka-rest.properties
./bin/ksql-server-start ./etc/ksql/ksql-server.properties- Access Confluent Control Center: If you started it, you can access the Confluent Control Center via your web browser at
http://localhost:9021/.
Depending on your specific requirements and environment, additional configuration or setup might be necessary. Be sure to refer to the official Confluent documentation for more detailed installation and configuration instructions: https://docs.confluent.io/platform/current/installation/index.html
Basic Tutorials of Confluent: Getting Started
Certainly! Let’s have a look at a step-by-step basic tutorial to help you get started with Confluent:

Step 1: Install Confluent
- Ensure you have Java installed on your system, as Confluent relies on it.
- Download the Confluent Platform from the Confluent website (https://www.confluent.io/download/).
- Extract the downloaded archive in the local directory of your wish.
Step 2: Start ZooKeeper
- Confluent relies on Apache ZooKeeper. Open a terminal or command prompt and navigate to the Confluent directory.
- Start ZooKeeper using the following command:
./bin/zookeeper-server-start ./etc/kafka/zookeeper.propertiesStep 3: Start Kafka Brokers
- In the same terminal or command prompt, start Kafka brokers with the following command:
./bin/kafka-server-start ./etc/kafka/server.propertiesStep 4: Start Schema Registry, REST Proxy, and KSQL (Optional)
- If you need these components, start them as well:
   ./bin/schema-registry-start ./etc/schema-registry/schema-registry.properties
   ./bin/kafka-rest-start ./etc/kafka-rest/kafka-rest.properties
   ./bin/ksql-server-start ./etc/ksql/ksql-server.properties
Step 5: Access Confluent Control Center (Optional)
- If you started it, you can access the Confluent Control Center via your web browser at
http://localhost:9021/.
Step 6: Create a Topic
- Open a new terminal or command prompt and navigate to the Confluent directory.
- Create a topic named “my_topic” with the following command:
./bin/kafka-topics --create --topic my_topic --bootstrap-server localhost:9092 --partitions 1 --replication-factor 1Step 7: Produce Messages to the Topic
- Open another terminal or command prompt and navigate to the Confluent directory.
- Produce messages to the “my_topic” topic using the following command:
./bin/kafka-console-producer --topic my_topic --bootstrap-server localhost:9092- Type some messages and press Enter after each message. These messages will be sent to the “my_topic” topic.
Step 8: Consume Messages from the Topic
- Open a new terminal or command prompt and navigate to the Confluent directory.
- Consume messages from the “my_topic” topic using the following command:
./bin/kafka-console-consumer --topic my_topic --bootstrap-server localhost:9092 --from-beginning- You should see the messages you produced in the previous step being consumed and displayed in the terminal.
Congratulations! You’ve successfully installed Confluent and performed basic operations with Kafka. This tutorial covers only the basics of using Confluent. As you become more familiar with it, you can explore advanced features, such as setting up multiple brokers, using Kafka Connect for data integration, working with KSQL for stream processing, and using the Schema Registry for data serialization. For more in-depth tutorials and examples, refer to the official Confluent documentation: https://docs.confluent.io/platform/current/quickstart/ce-quickstart.html
Email- contact@devopsschool.com

 Starting: 1st of Every Month
  +91 8409492687
  Contact@DevOpsSchool.com
