What is Microsoft Azure Stream Analytics?

Azure Stream Analytics is a real-time event processing service provided by Microsoft Azure. It enables you to ingest, process, and analyze streaming data from various sources in real-time, allowing you to gain insights and take actions based on the incoming data streams.
Top 10 Use Cases of Microsoft Azure Stream Analytics:
- IoT Data Processing: Ingest and process data from IoT devices, sensors, and connected devices in real-time to monitor, analyze, and respond to events.
- Real-Time Analytics: Analyze streaming data to detect trends, anomalies, and patterns as they happen, enabling timely decision-making.
- Fraud Detection: Monitor financial transactions, online activities, and more to identify potential fraudulent behavior in real-time.
- Predictive Maintenance: Analyze sensor data from machines and equipment to predict and prevent failures, optimizing maintenance schedules.
- Social Media Analysis: Analyze social media streams to understand sentiment, trends, and user engagement in real-time.
- Log and Event Monitoring: Monitor logs and events from applications, servers, and network devices to detect issues and respond promptly.
- Supply Chain Optimization: Track and analyze data from supply chain components to optimize inventory management and distribution.
- Location-Based Services: Process location data from devices and applications to provide location-based services and insights.
- Energy Management: Analyze data from energy meters, sensors, and grids to optimize energy consumption and distribution.
- Healthcare Monitoring: Process real-time health data from wearable devices and medical equipment for patient monitoring and alerts.
These use cases highlight the versatility of Azure Stream Analytics in various industries and scenarios. It’s particularly well-suited for scenarios that require real-time data processing, analysis, and response.
Azure Stream Analytics offers a user-friendly, SQL-like language for defining queries and transformations on streaming data. It supports integration with other Azure services like Azure IoT Hub, Azure Event Hubs, Azure Functions, and more, allowing you to build end-to-end solutions that combine streaming data processing with actions and insights.
What are the feature of Microsoft Azure Stream Analytics?

- Real-Time Data Processing: Azure Stream Analytics enables processing of streaming data in real-time, allowing for immediate insights and responses.
- Scalability: It automatically scales up or down based on the data volume, ensuring efficient resource utilization and performance.
- Integration: Seamlessly integrates with other Azure services like Azure IoT Hub, Azure Event Hubs, Azure Functions, and more.
- Simple Query Language: Uses a SQL-like query language for defining queries and transformations on streaming data, making it accessible to users familiar with SQL.
- Time Windowing: Supports windowing functions to analyze data within specific time intervals, allowing you to group and aggregate data effectively.
- Output Sinks: Enables sending processed data to various output sinks, including Azure Storage, Azure SQL Database, Power BI, and more.
- Built-in Functions: Offers built-in functions for data transformation, filtering, aggregation, and pattern matching.
- Exactly-Once Processing: Provides exactly-once processing semantics, ensuring that data is not duplicated or lost during processing.
- Monitoring and Diagnostics: Offers monitoring, diagnostics, and alerts to track the health and performance of your streaming jobs.
- Temporal Join Support: Supports joining real-time streaming data with historical reference data for more comprehensive insights.
How Microsoft Azure Stream Analytics Works and Architecture?

Azure Stream Analytics processes streaming data using a series of steps:
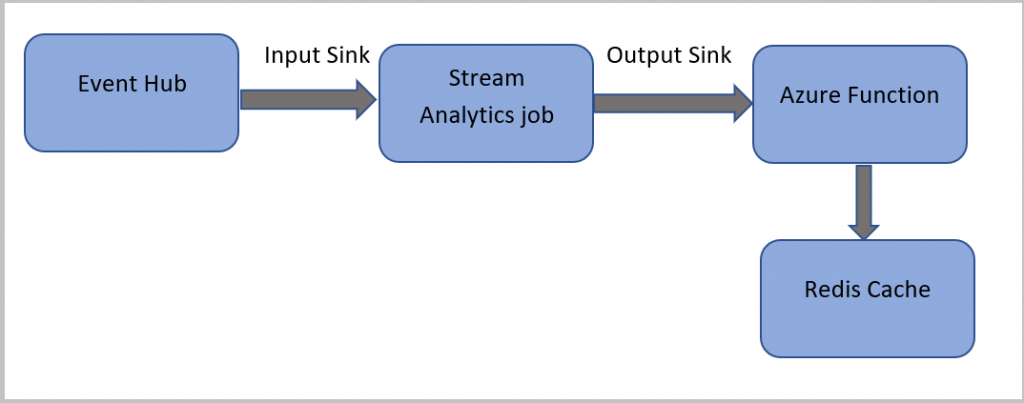
- Ingestion: Data from various sources (e.g., IoT devices, log streams, event hubs) is ingested into Azure Stream Analytics.
- Query Definition: You define queries using SQL-like language for filtering, transformation, and analysis. These queries are continuously applied to incoming data streams.
- Processing: Stream Analytics processes the data as it arrives in real-time according to the defined queries. This can involve filtering, aggregation, enrichment, and more.
- Time Windowing: If required, you can use time windowing to group and analyze data within specific time intervals.
- Output Sinks: Processed data is sent to specified output sinks, such as Azure Storage, databases, or visualization tools like Power BI.
- Scaling: Azure Stream Analytics automatically scales up or down based on the data volume and processing requirements to ensure optimal resource utilization.
- Integration: It integrates with other Azure services, enabling you to trigger actions (Azure Functions) or store data (Azure Storage) based on processed results.
Architecture:
Azure Stream Analytics uses a distributed architecture that involves multiple components:
- Job Topology: The job topology defines the data sources, transformations, and outputs for a specific Stream Analytics job.
- Input Adapters: Ingest data from various sources such as Azure Event Hubs, IoT Hub, or external sources.
- Query Processing Engine: The heart of Stream Analytics, it processes data based on the queries defined in the job.
- Output Adapters: Send processed data to output sinks such as Azure Storage, SQL Database, Power BI, and more.
- Azure Monitor: Provides monitoring, diagnostics, and logging for Stream Analytics jobs.
Azure Stream Analytics abstracts much of the underlying infrastructure complexity, allowing you to focus on defining your data processing logic and queries. It automatically handles scalability, fault tolerance, and resource management to provide a reliable and efficient streaming data processing solution.
How to Install Microsoft Azure Stream Analytics?
There are two ways to install Microsoft Azure Stream Analytics:
- Using the Azure CLI:
- Open a command prompt and navigate to the directory where you want to install Azure Stream Analytics.
- Run the following command:
az acr create my-acr --resource-group my-resource-group --location westus2* This command will create an Azure Container Registry (ACR) called `my-acr` in the resource group `my-resource-group` in the region `westus2`.
3. Run the following command to download the Azure Stream Analytics image:az acr download --name my-acr --image microsoft.streamanalytics/streamanalytics:latest* This command will download the latest version of the Azure Stream Analytics image to your local machine.
4. Run the following command to create a Dockerfile:FROM microsoft.streamanalytics/streamanalytics:latest* This Dockerfile will use the Azure Stream Analytics image as the base image.
5. Add the following lines to the Dockerfile:COPY my-stream-analytics.json /opt/streamanalytics/config/my-stream-analytics.json
CMD streamanalytics controller start --config /opt/streamanalytics/config/my-stream-analytics.json* These lines will copy the `my-stream-analytics.json` file to the container and start the Azure Stream Analytics controller.
6. Build the Docker image:docker build -t my-stream-analytics .* This will build the Docker image called `my-stream-analytics`.
7. Run the Docker image:docker run -it --rm my-stream-analytics* This will start the Azure Stream Analytics controller in a Docker container.- Using the Azure Portal:
- Go to the Azure Portal and sign in to your account.
- Select the Create a resource button.
- Search for Stream Analytics and click the Create button.
- In the Create Stream Analytics job blade, enter the following information:
- Name: The name of your Stream Analytics job.
- Location: The region where you want to create your Stream Analytics job.
- Subscription: The subscription that you want to use for your Stream Analytics job.
- Resource group: The resource group that you want to use for your Stream Analytics job.
- Compute: The compute tier for your Stream Analytics job.
- Storage: The storage account that you want to use for your Stream Analytics job.
- Input: The input data source for your Stream Analytics job.
- Output: The output data sink for your Stream Analytics job.
- Click the Create button to create your Stream Analytics job.
Once you have installed Azure Stream Analytics, you can start creating and running Stream Analytics jobs.
Basic Tutorials of Microsoft Azure Stream Analytics: Getting Started

Here are some step-by-step basic tutorials of Microsoft Azure Stream Analytics:
- Create a simple Stream Analytics job using the Azure Portal: This tutorial shows you how to create a simple Stream Analytics job using the Azure Portal.
- Open the Azure Portal and sign in to your account.
- Apply a hit on the Create a resource button.
- Search for Stream Analytics and click the Create button.
- In the Create Stream Analytics job blade, enter the following information:
- Name: The name of your Stream Analytics job.
- Location: The region where you want to create your Stream Analytics job.
- Subscription: The subscription that you want to use for your Stream Analytics job.
- Resource group: The resource group that you want to use for your Stream Analytics job.
- Compute: The compute tier for your Stream Analytics job.
- Storage: The storage account that you want to use for your Stream Analytics job.
- Input: The input data source for your Stream Analytics job.
- Output: The output data sink for your Stream Analytics job.
- Click the Create button to create your Stream Analytics job.
- Create a simple Stream Analytics job using the Azure CLI: This tutorial shows you how to create a simple Stream Analytics job using the Azure CLI.
- Open a command prompt and navigate to the directory where you want to create your Stream Analytics job.
- Run the following command to create a Stream Analytics job:
az streamanalytics job create my-job –location westus2 –resource-group my-resource-group –compute standard –storage my-storage-account –input my-input –output my-output
* This command will create a Stream Analytics job called `my-job` in the resource group `my-resource-group` in the region `westus2`. The job will use the standard compute tier, the storage account `my-storage-account`, the input `my-input`, and the output `my-output`.- Create a simple Stream Analytics job using Visual Studio: This tutorial shows you how to create a simple Stream Analytics job using Visual Studio.
- Go to Visual Studio and generate a new project.
- Select the Azure Stream Analytics Job project template.
- In the Project name field, enter the name of your Stream Analytics job.
- In the Subscription field, select the subscription that you want to use for your Stream Analytics job.
- In the Resource group field, select the resource group that you want to use for your Stream Analytics job.
- In the Location field, select the region where you want to create your Stream Analytics job.
- In the Compute field, select the compute tier for your Stream Analytics job.
- In the Storage field, select the storage account that you want to use for your Stream Analytics job.
- In the Input field, select the input data source for your Stream Analytics job.
- In the Output field, select the output data sink for your Stream Analytics job.
- Click the Create button to create your Stream Analytics job.
Once you have created a Stream Analytics job, you can start writing Stream Analytics queries.
Here is an example of a simple Stream Analytics query:
from my-input
select count(*) as total_events
This query will count the number of events in the input stream and output the count to the output sink.
Email- contact@devopsschool.com

 Starting: 1st of Every Month
  +91 8409492687
  Contact@DevOpsSchool.com
