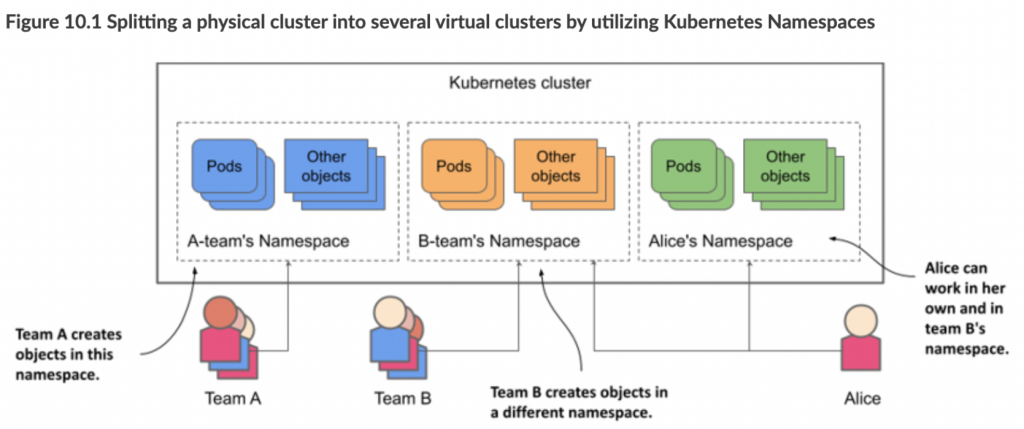
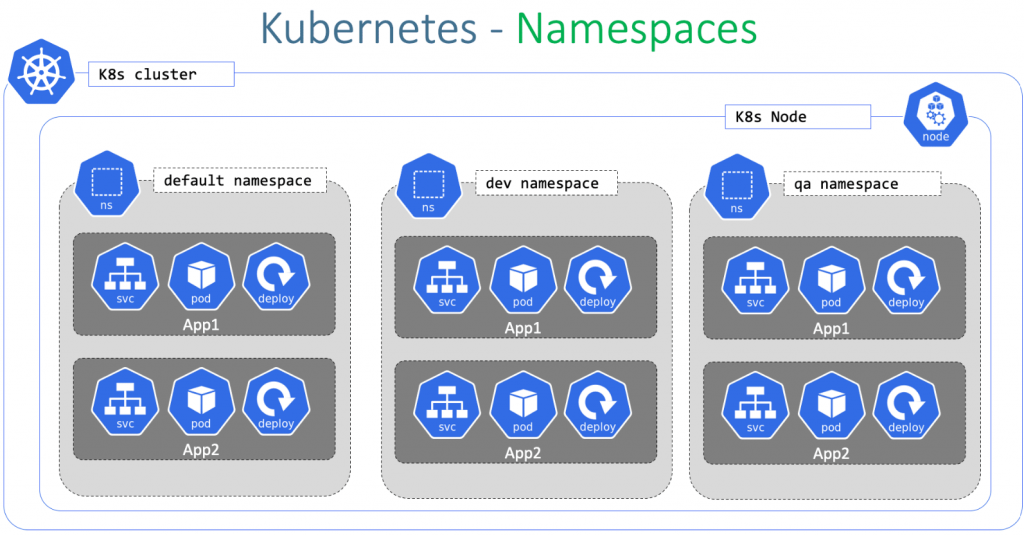
Kubernetes namespaces are a way to organize, isolate, and manage Kubernetes resources. They provide a virtual sub-cluster within a Kubernetes cluster, and they can be used to separate resources by project, team, or environment.
Each namespace has its own unique identifier, and resources within a namespace can only be accessed by users who have permission to access that namespace. This helps to prevent conflicts between different teams or projects, and it also helps to improve security by isolating resources from each other.
Some of the benefits of using Kubernetes namespaces include:
- Isolation: Namespaces isolate resources from each other, which can help to prevent conflicts and improve security.
- Organization: Namespaces can be used to organize resources by project, team, or environment. This can make it easier to manage resources and to find the resources that you need.
- Resource quotas: Namespaces can be used to set resource quotas, which can help to ensure that no single team or project consumes too many resources.
- Role-based access control (RBAC): RBAC can be used to grant users different levels of access to resources within a namespace. This can help to improve security and to ensure that users only have access to the resources that they need.
Here are some examples of how Kubernetes namespaces can be used:
- A production team can use a namespace to isolate their production resources from the development team’s resources.
- A company can use namespaces to isolate the resources of its different customers.
- A team can use namespaces to isolate the resources of its different projects.
- A developer can use namespaces to isolate the resources of their different development environments.
Here’s a detailed and easy-to-follow Kubernetes Namespace Tutorial using the notes you provided. This guide includes explanations, command examples, YAML usage, and follows best practices for teaching both CLI and declarative methods.
🧠 Kubernetes Namespace Tutorial
📌 What is a Namespace in Kubernetes?
Namespaces in Kubernetes are used to organize resources into virtual clusters within the same physical cluster. They are ideal for:
- Environment separation (dev, test, prod)
- Multi-tenancy
- Resource scoping
- Access control
⚙️ CRUD Pattern for Kubernetes Resources
Understanding the CRUD pattern (Create, Read, Update, Delete) is key for managing any Kubernetes resource.
| Action | CLI Command | YAML Equivalent |
|---|---|---|
| Create | kubectl create | kubectl create -f |
| Read | kubectl get, describe | kubectl get -o yaml |
| Update | kubectl edit | kubectl apply -f |
| Delete | kubectl delete | kubectl delete -f |
🚀 Create Namespace (Imperative Command)
$ kubectl get ns
# Check existing namespaces

$ kubectl create ns rajesh
# Create a new namespace called "rajesh"

$ kubectl get ns
# Confirm creation

$ kubectl describe ns rajesh
# Detailed metadata and status

$ kubectl edit ns rajesh
# Edit namespace labels or annotations
Code language: PHP (php)
🗑️ Delete Namespace (Imperative)
$ kubectl delete ns rajesh
# Deletes the namespace

$ kubectl get ns
# Confirm deletion
Code language: PHP (php)
📄 Namespace YAML Definition (Declarative Method)
Step 1: Generate YAML
You can export an existing namespace YAML for reference:
$ kubectl get ns devops -o yaml
Code language: JavaScript (javascript)
Sample output:
apiVersion: v1
kind: Namespace
metadata:
  name: devops1
  labels:
    kubernetes.io/metadata.name: devops1
Step 2: Create Namespace from YAML
$ mkdir rajesh
$ cd rajesh/
$ vi ns.yaml
Paste the following:
apiVersion: v1
kind: Namespace
metadata:
  name: rajesh
  labels:
    env: test
Code language: PHP (php)
$ kubectl create -f ns.yaml
# Namespace created from YAML
$ kubectl get ns
# Verify
Code language: PHP (php)Step 3: Update Namespace via YAML
Edit ns.yaml:
metadata:
  name: rajesh
  labels:
    env: production
Apply changes:
$ kubectl apply -f ns.yaml
# Changes applied declaratively
Code language: PHP (php)
Step 4: Read & Inspect YAML
$ kubectl get ns rajesh -o yaml
# See YAML view of the namespace

$ kubectl describe -f ns.yaml
# Detailed view of YAML-based namespace (alternative to `describe ns rajesh`)
Code language: PHP (php)
Step 5: Delete Namespace from YAML
$ kubectl delete -f ns.yaml
# Deletes using the YAML definition

$ kubectl get ns
# Verify it's deleted
Code language: PHP (php)
🧠 Summary of Key Commands
# Check existing namespaces
kubectl get ns

# Create a namespace
kubectl create ns <name>

# Read details
kubectl describe ns <name>

# Edit namespace inline
kubectl edit ns <name>

# Delete namespace
kubectl delete ns <name>

# YAML-based:
kubectl create -f ns.yaml
kubectl apply -f ns.yaml
kubectl delete -f ns.yaml
kubectl get ns <name> -o yaml
Code language: PHP (php)
namespace.yaml
apiVersion: v1
kind: Namespace
metadata:
  name: playgroundinyamlCode language: PHP (php)
deployment.yaml
apiVersion: apps/v1
kind: Deployment
metadata:
  name: hello-world
  labels:
    app: hello-world
  namespace: playground1
spec:
  replicas: 4
  selector:
    matchLabels:
      app: hello-world
  template:
    metadata:
      labels:
        app: hello-world
    spec:
      containers:
      - name: hello-world
        image: gcr.io/google-samples/hello-app:1.0
        ports:
        - containerPort: 8080
Commands
$ ssh aen@c1-master1
$ cd ~/content/course/m3/demos

#Get a list of all the namespaces in our cluster
$ kubectl get namespaces

#get a list of all the API resources and if they can be in a namespace
$ kubectl api-resources --namespaced=true | head
$ kubectl api-resources --namespaced=false | head

#Namespaces have state, Active and Terminating (when it's deleting)
$ kubectl describe namespaces

#Describe the details of an indivdual namespace
$ kubectl describe namespaces kube-system

#Get all the pods in our cluster across all namespaces. Right now, only system pods, no user workload
$ kubectl get pods --all-namespaces

#Get all the resource across all of our namespaces
$ kubectl get all --all-namespaces

#Get a list of the pods in the kube-system namespace
$ kubectl get pods --namespace kube-system

#Imperatively create a namespace
$ kubectl create namespace playground1

#Imperatively create a namespace...but there's some character restrictions. Lower case and only dashes.
$ kubectl create namespace Playground1

#Declaratively create a namespace
more namespace.yaml
$ kubectl apply -f namespace.yaml

#Get a list of all the current namespaces
$ kubectl get namespaces

#Start a deployment into our playground1 namespace
$ more deployment.yaml
$ kubectl apply -f deployment.yaml

#Creating a resource imperitively
$ kubectl run hello-world-pod \
    --image=gcr.io/google-samples/hello-app:1.0 \
    --generator=run-pod/v1 \
    --namespace playground1

#Where are the pods?
$ kubectl get pods

#List all the pods on our namespace
$ kubectl get pods --namespace playground1
$ kubectl get pods -n playground1

#Get a list of all of the resources in our namespace...Deployment, ReplicaSet and Pods
$ kubectl get all --namespace=playground1

# Try to delete all the pods in our namespace...this will delete the single pod.
# But the pods under the Deployment controller will be recreated.
$ kubectl delete pods --all --namespace playground1

# Get a list of all of the *new* pods in our namespace
$ kubectl get pods -n playground1

#Delete all of the resources in our namespace and the namespace and delete our other created namespace.
#This deletes the Deployment controller, the Pods...or really ALL resources in the namespaces
$ kubectl delete namespaces playground1
$ kubectl delete namespaces playgroundinyaml

#List all resources in all namespaces, now our Deployment is gone.
$ kubectl get all
$ kubectl get all --all-namespaces
I’m a DevOps/SRE/DevSecOps/Cloud Expert passionate about sharing knowledge and experiences. I am working at Cotocus. I blog tech insights at DevOps School, travel stories at Holiday Landmark, stock market tips at Stocks Mantra, health and fitness guidance at My Medic Plus, product reviews at I reviewed , and SEO strategies at Wizbrand.
Do you want to learn Quantum Computing?
Please find my social handles as below;
Rajesh Kumar Personal Website
Rajesh Kumar at YOUTUBE
Rajesh Kumar at INSTAGRAM
Rajesh Kumar at X
Rajesh Kumar at FACEBOOK
Rajesh Kumar at LINKEDIN
Rajesh Kumar at PINTEREST
Rajesh Kumar at QUORA
Rajesh Kumar at WIZBRAND
