In this example, I am going to show you how to insert data in the database using laravel framework PHP.
First, creating table the SQL query:
CREATE TABLE student_details
(
id int NOT NULL AUTO_INCREMENT,
first_name varchar(50),
last_name varchar(50),
city_name varchar(50),
email varchar(50),
PRIMARY KEY (id)
);
Now, create three file for insert data in Laravel.
Step 1. Create a controller name as StudInsertController.php.
The file location is : (app/Http/Controllers/StudInsertController.php)
Step 2. Create view page name as stud_create.php
The file location is: (resources/views/stud_create.php)
Then put this code in your StudInsertController.php.
| <?php | |
| namespace App\Http\Controllers; | |
| use Illuminate\Http\Request; | |
| use DB; | |
| use App\Http\Requests; | |
| use App\Http\Controllers\Controller; | |
| class StudInsertController extends Controller | |
| { | |
| // | |
| public function insertform(){ | |
| return view('stud_create'); | |
| } | |
| public function insert(Request $request){ | |
| $first_name = $request->input('first_name'); | |
| $last_name = $request->input('last_name'); | |
| $city_name = $request->input('city_name'); | |
| $email = $request->input('email'); | |
| $data=array('first_name'=>$first_name,"last_name"=>$last_name,"city_name"=>$city_name,"email"=>$email); | |
| DB::table('student_details')->insert($data); | |
| echo "Record inserted successfully.<br/>"; | |
| echo '<a href = "/insert">Click Here</a> to go back.'; | |
| } | |
| } |
Then put this code in your stud_create.blade.php.
| <!DOCTYPE html> | |
| <html lang="en"> | |
| <head> | |
| <title>Student Management</title> | |
| <meta charset="utf-8"> | |
| <meta name="viewport" content="width=device-width, initial-scale=1"> | |
| <link rel="stylesheet" href="https://maxcdn.bootstrapcdn.com/bootstrap/4.5.0/css/bootstrap.min.css"> | |
| <script src="https://ajax.googleapis.com/ajax/libs/jquery/3.5.1/jquery.min.js"></script> | |
| <script src="https://cdnjs.cloudflare.com/ajax/libs/popper.js/1.16.0/umd/popper.min.js"></script> | |
| <script src="https://maxcdn.bootstrapcdn.com/bootstrap/4.5.0/js/bootstrap.min.js"></script> | |
| </head> | |
| <body> | |
| <div class="container"> | |
| <h2 class="text-center">Student Management | Add</h2> | |
| <br> | |
| <form action = "/create" method = "post" class="form-group" style="width:70%; margin-left:15%;" action="/action_page.php"> | |
| <input type = "hidden" name = "_token" value = "<?php echo csrf_token(); ?>"><input type = "hidden" name = "_token" value = "<?php echo csrf_token(); ?>"> | |
| <label class="form-group">First Name:</label> | |
| <input type="text" class="form-control" placeholder="First Name" name="first_name"> | |
| <label>Last Name:</label> | |
| <input type="text" class="form-control" placeholder="Last Name" name="last_name"> | |
| <label>City Name:</label> | |
| <select class="form-control" name="city_name"> | |
| <option value="bhubaneswar">Bhubaneswar</option> | |
| <option value="cuttack">Cuttack</option> | |
| </select> | |
| <label>Email:</label> | |
| <input type="text" class="form-control" placeholder="Enter Email" name="email"><br> | |
| <button type="submit" value = "Add student" class="btn btn-primary">Submit</button> | |
| </form> | |
| </div> | |
| </body> | |
| </html> |
Step 3. Then go to routes as web.php and put this code.
The file location is : (routes/web.php)
Route::get('insert','StudInsertController@insertform');
Route::post('create','StudInsertController@insert');
Then, you can see the data is inserted.
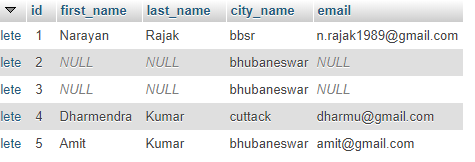
So, the data is inserted in the database, then we need to retrieve a record or data from the MySQL database.
Step 4. Create a controller for view name as StudViewController.php.
The file location is : (app/Http/Controllers/StudViewController.php)
Step 5. Create a view page name as stud_view.blade.php.
The file location is : (resources/views/stud_view.blade.php).
Then put this code StudViewController.php.
| <?php | |
| namespace App\Http\Controllers; | |
| use Illuminate\Http\Request; | |
| use DB; | |
| use App\Http\Controllers\Controller; | |
| class StudViewController extends Controller | |
| { | |
| // | |
| public function index(){ | |
| $users = DB::select('select * from student_details'); | |
| return view('stud_view',['users'=>$users]); | |
| } | |
| } |
Then, retrieve the students data then put this code stud_view.blade.php.
| <!DOCTYPE html> | |
| <html lang="en"> | |
| <head> | |
| <title>View Student Records</title> | |
| <meta charset="utf-8"> | |
| <meta name="viewport" content="width=device-width, initial-scale=1"> | |
| <link rel="stylesheet" href="https://maxcdn.bootstrapcdn.com/bootstrap/4.5.0/css/bootstrap.min.css"> | |
| <script src="https://ajax.googleapis.com/ajax/libs/jquery/3.5.1/jquery.min.js"></script> | |
| <script src="https://cdnjs.cloudflare.com/ajax/libs/popper.js/1.16.0/umd/popper.min.js"></script> | |
| <script src="https://maxcdn.bootstrapcdn.com/bootstrap/4.5.0/js/bootstrap.min.js"></script> | |
| </head> | |
| <body> | |
| <div class="container"> | |
| <h2 class="text-center">View Student Records</h2> | |
| <table class="table table-bordered table-striped"> | |
| <thead> | |
| <tr> | |
| <th>ID</th> | |
| <th>First Name</th> | |
| <th>Last Name</th> | |
| <th>City Name</th> | |
| <th>Email</th> | |
| </tr> | |
| </thead> | |
| <tbody> | |
| @foreach ($users as $user) | |
| <tr> | |
| <td>{{ $user->id }}</td> | |
| <td>{{ $user->first_name }}</td> | |
| <td>{{ $user->last_name }}</td> | |
| <td>{{ $user->city_name }}</td> | |
| <td>{{ $user->email }}</td> | |
| </tr> | |
| @endforeach | |
| </tbody> | |
| </table> | |
| </div> | |
| </body> | |
| </html> |
Step 6. Then go to routes as web.php and put this code.
The file location is (routes/web.php)
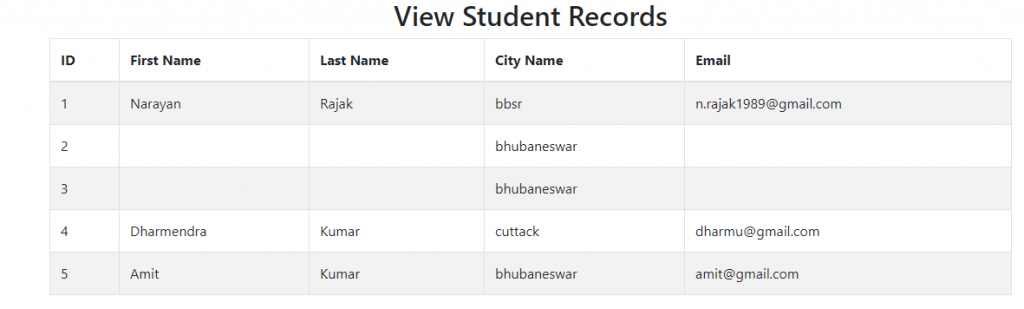
Route::get('view-records','StudViewController@index');Then, you can see the view page.
MotoShare.in provides the perfect two-wheeler for every occasion—daily commuting, weekend escapes, tourist exploration, or test-riding your dream bike. Simplify your mobility with us!
