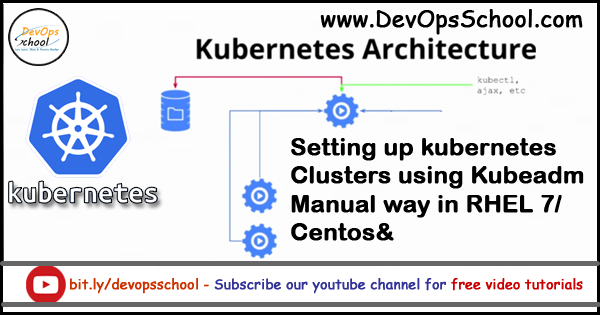
What is Kubeadm?
Kubeadm helps you bootstrap a minimum viable Kubernetes cluster that conforms to best practices. Kubeadm is a tool built to provide kubeadm init and kubeadm join as best-practice “fast paths” for creating Kubernetes clusters.
Goal
- To Install a single master Kubernetes cluster
- To Install a high availability master Kubernetes cluster
- To Install a Pod network on the cluster so that your Pods can talk to each other.
kubeadm’s simplicity means it can serve a wide range of use cases:
- New users can start with kubeadm to try Kubernetes out for the first time.
- Users familiar with Kubernetes can spin up clusters with kubeadm and test their applications.
- Larger projects can include kubeadm as a building block in a more complex system that can also include other installer tools.
Pre-requisite
- One or more machines running a deb/rpm-compatible OS, for example Ubuntu or CentOS
- 2 GB or more of RAM per machine. Any less leaves little room for your apps.
- 2 CPUs or more on the master
- Full network connectivity among all machines in the cluster. A public or private network is fine
Pre-requisite – Installing Docker [ This need to be there in Master and Worker Node. Both]
As part of the installation, every node (master and minions) needs:
- kubeadm: the command to bootstrap the cluster.
- kubelet: the component that runs on all of the machines in your cluster and does things like starting pods and containers.
- kubectl: the command line util to talk to your cluster.
- Docker: Container Enginer
- CNI: Container Network interfacer
Master: Setting Up a Kubernetes Control Plane
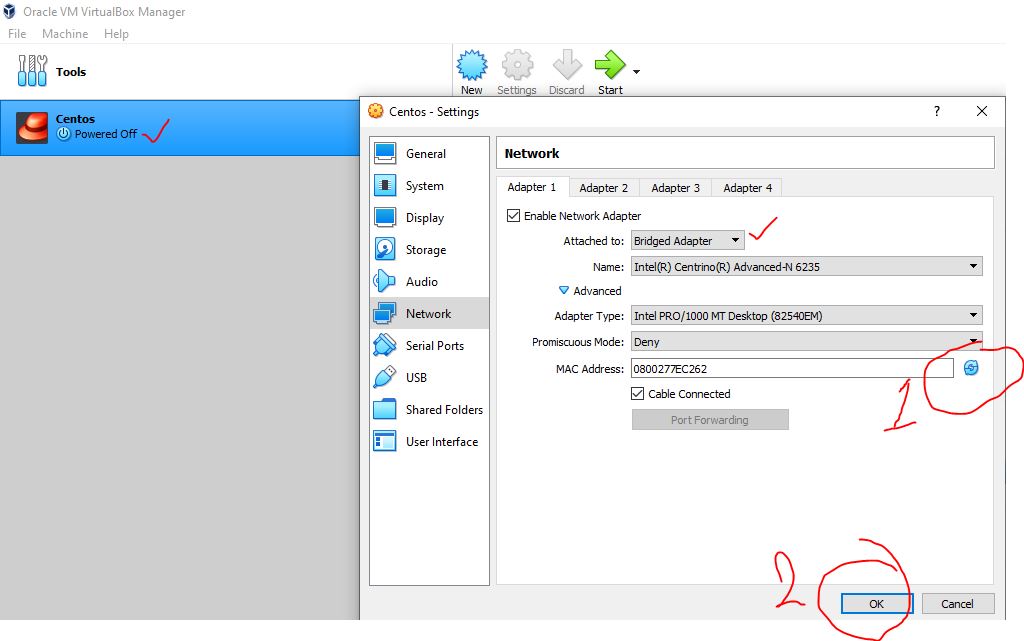
Step 1 – Change VMs Mac Address in Virtual box -> Setting -> Network ->Advance
Note – Please POWER off the VM before changing Mac Address.
Step 2 – Change Host Name of Master Server
$ hostnamectl set-hostname rajesh.master.comCode language: JavaScript (javascript)Step 3 – Stop and Disable Firewall
$ systemctl stop firewalld
$ systemctl disable firewalld
Step 4 – Disable swap
$ sudo swapoff -a
$ sudo sed -i '/ swap / s/^/#/' /etc/fstab

# Reboot a machine after that.
$ shutdown -r nowCode language: PHP (php)
Step 5 – Install and Start Docker Community Editon in Master Server
Command 1 - Install required packages. yum-utils provides the yum-config-manager utility, and device-mapper-persistent-data and lvm2 are required by the devicemapper storage driver.
$ sudo -s
$ sudo yum install -y yum-utils device-mapper-persistent-data lvm2
Command 2 - Use the following command to set up the stable repository
$ sudo yum-config-manager --add-repo https://download.docker.com/linux/centos/docker-ce.repo
Command 3 - Install the latest version of Docker CE
$ sudo yum install –y https://dl.fedoraproject.org/pub/epel/epel-release-latest-7.noarch.rpm
$ sudo yum-config-manager --enable rhui-REGION-rhel-server-extras
$ sudo yum install -y docker-ce
$ sudo yum install docker-ce
Command 4 - Enable Docker
$ sudo systemctl enable docker
Command 5 - Start Docker and Verify Docker Installations
$ sudo systemctl start docker
$ docker -v
$ docker info
Special Step – For Docker Only with Kubernetes 1.22
Step 6 – Setup yum repo for kubelet kubeadm kubectl
| ----------ONE COMMAND---------------- | |
| cat <<EOF > /etc/yum.repos.d/kubernetes.repo | |
| [kubernetes] | |
| name=Kubernetes | |
| baseurl=https://packages.cloud.google.com/yum/repos/kubernetes-el7-x86_64 | |
| enabled=1 | |
| gpgcheck=1 | |
| repo_gpgcheck=0 | |
| gpgkey=https://packages.cloud.google.com/yum/doc/yum-key.gpg https://packages.cloud.google.com/yum/doc/rpm-package-key.gpg | |
| exclude=kube* | |
| EOF | |
| -------------------------- |
Step 7 – Set SELinux in permissive mode (effectively disabling it)
$ setenforce 0
$ sed -i 's/^SELINUX=enforcing$/SELINUX=permissive/' /etc/selinux/configCode language: JavaScript (javascript)
Step 8 – Install kubelet kubeadm kubectl and enable kubelet
$ yum install -y kubelet-1.22.0-0.x86_64 kubeadm-1.22.0-0.x86_64 kubectl-1.22.0-0.x86_64 --disableexcludes=kubernetes
$ systemctl enable --now kubelet

# Latest
$ yum install -y kubelet kubeadm kubectl --disableexcludes=kubernetes
# Kubernetes 1.23
$ yum install -y kubelet-1.23.0-0.x86_64 kubeadm-1.23.0-0.x86_64 kubectl-1.23.0-0.x86_64 --disableexcludes=kubernetes
# Kubernetes 1.22
$ yum install -y kubelet-1.22.0-0.x86_64 kubeadm-1.22.0-0.x86_64 kubectl-1.22.0-0.x86_64 --disableexcludes=kubernetes
# Kubernetes 1.21
$ yum install -y kubelet-1.21.0-0.x86_64 kubeadm-1.21.0-0.x86_64 kubectl-1.21.0-0.x86_64 --disableexcludes=kubernetes
# Kubernetes 1.20
$ yum install -y kubelet-1.20.0-0.x86_64 kubeadm-1.20.0-0.x86_64 kubectl-1.20.0-0.x86_64 --disableexcludes=kubernetesCode language: PHP (php)
Step 9 – Finally, initialize a kubernetes clusters
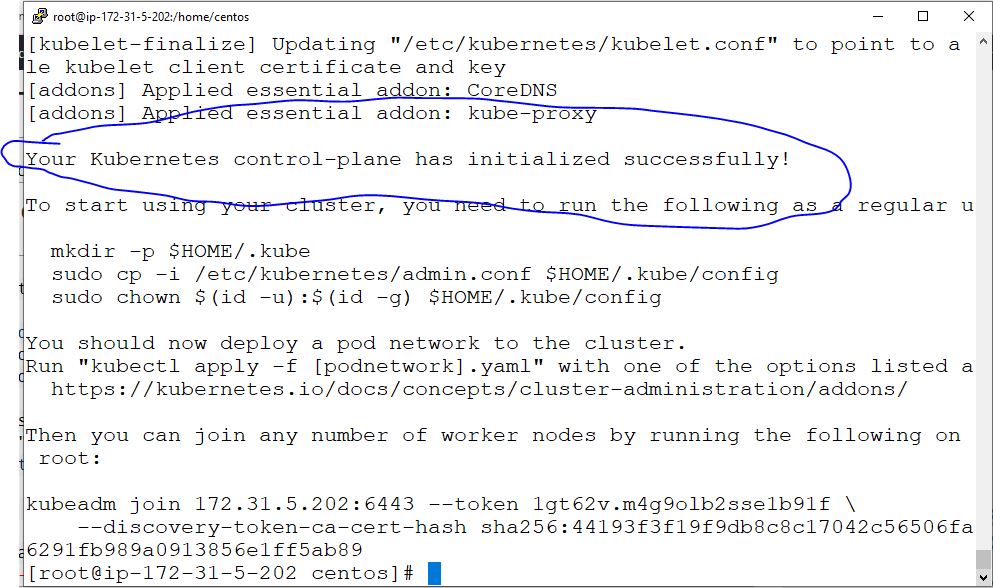
$ kubeadm init --ignore-preflight-errors all

# How to install older version of Kubernetes
# kubeadm init --kubernetes-version=v1.9.2  Code language: PHP (php)
Step 10 – Output
Workstation: Setting Up a Kubernetes Workstation
Step 11 – Setup Workstation in the Master node only. You can be regular user for it.
$ mkdir -p $HOME/.kube
$ sudo cp -i /etc/kubernetes/admin.conf $HOME/.kube/config
$ sudo chown $(id -u):$(id -g) $HOME/.kube/configCode language: PHP (php)
Step 12 – Verify Clustors
$ kubectl get nodes
$ kubectl get pods --all-namespacesCode language: JavaScript (javascript)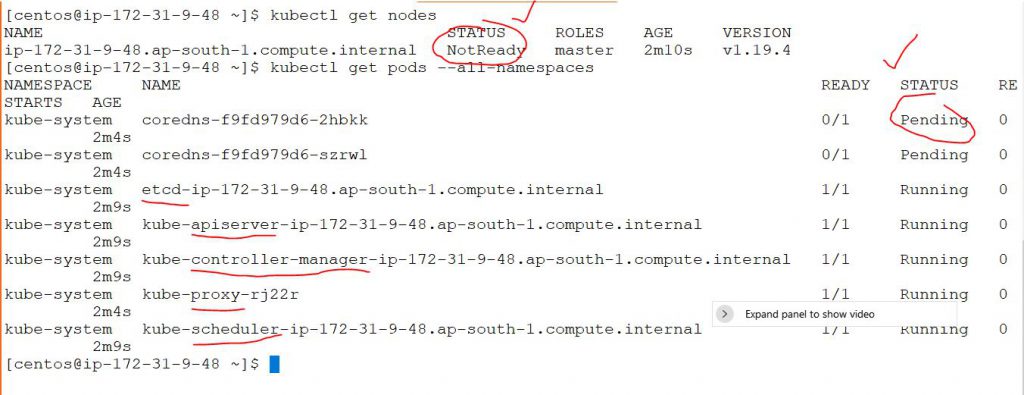
Step 13 – Install Kubernetes pod networking
Weave Net provides networking and network policy, will carry on working on both sides of a network partition, and does not require an external database. Kubernetes versions 1.6 and above:
$ kubectl apply -f "https://cloud.weave.works/k8s/net?k8s-version=$(kubectl version | base64 | tr -d '\n')"
$ kubectl get nodes
$ kubectl get pods --all-namespaces
$ kubectl get nodesCode language: JavaScript (javascript)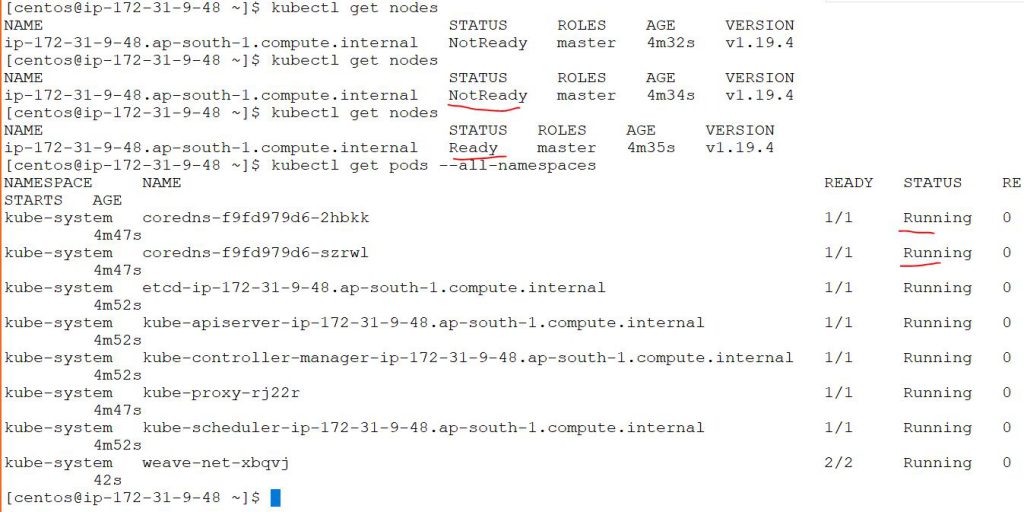
Worker: Setting Up a Kubernetes Worker
Step 14 – Setup nodes [ In the node aka worker
# Follow Step 1
# Follow Step 2
# Follow Step 3
# Follow Step 4
# Follow Step 5
# Follow Step 6
# Follow Step 7
# Follow Step 8

# Run following commands which we got from kubeadm init
$ kubeadm join 172.31.31.106:6443 --token pdn6in.r0dzhpx1ucrs69au --discovery-token-ca-cert-hash sha256:a9385951e659a3c67f55ccfbdc1169b1f660ba09aaf8cc6d5cc96d71b71900d2Code language: PHP (php)I’m a DevOps/SRE/DevSecOps/Cloud Expert passionate about sharing knowledge and experiences. I am working at Cotocus. I blog tech insights at DevOps School, travel stories at Holiday Landmark, stock market tips at Stocks Mantra, health and fitness guidance at My Medic Plus, product reviews at I reviewed , and SEO strategies at Wizbrand.
Do you want to learn Quantum Computing?
Please find my social handles as below;
Rajesh Kumar Personal Website
Rajesh Kumar at YOUTUBE
Rajesh Kumar at INSTAGRAM
Rajesh Kumar at X
Rajesh Kumar at FACEBOOK
Rajesh Kumar at LINKEDIN
Rajesh Kumar at PINTEREST
Rajesh Kumar at QUORA
Rajesh Kumar at WIZBRAND
