What is Checkmarx?

Checkmarx is a widely used application security testing (AST) solution that helps organizations identify and remediate security vulnerabilities in their software applications during the development and testing phases. Checkmarx offers a variety of features and capabilities to support secure software development.
It aids in identifying and mitigating vulnerabilities and promoting a culture of security awareness among developers and stakeholders. The platform’s flexibility and integration capabilities make it a valuable tool for organizations looking to build secure software.
Top 10 use cases of Checkmarx:
Here are the top 10 use cases for Checkmarx:
- Static Application Security Testing (SAST): Checkmarx performs static analysis of source code, byte code, and binary code to identify security vulnerabilities and coding errors early in the software development lifecycle.
- Interactive Application Security Testing (IAST): Checkmarx offers IAST capabilities, which analyze the application’s runtime behavior to identify vulnerabilities and provide real-time feedback to developers.
- Dynamic Application Security Testing (DAST): It supports DAST, enabling organizations to scan running web applications to find security vulnerabilities such as XSS, SQL injection, and more.
- Software Composition Analysis (SCA): Checkmarx can scan open-source and third-party components used in an application to identify known vulnerabilities and licensing issues.
- Vulnerability Assessment: Checkmarx identifies and ranks security vulnerabilities, such as OWASP Top 10 issues, CVEs, and custom security threats, allowing organizations to prioritize remediation efforts effectively.
- Continuous Integration (CI) and Continuous Deployment (CD) Integration: Checkmarx seamlessly integrates with CI/CD pipelines, providing automated code scans and vulnerability assessments as part of the development process.
- Remediation Guidance: Checkmarx provides detailed remediation guidance and code fix suggestions, enabling developers to efficiently address identified vulnerabilities.
- Security Training: It offers educational resources and training materials to help developers and security teams understand application security best practices and coding guidelines.
- Compliance Reporting: Checkmarx generates compliance reports to help organizations demonstrate adherence to security standards and regulatory requirements, such as PCI DSS and HIPAA.
- Customized Policies: Organizations can define custom security policies and coding standards to align with their specific security requirements and compliance needs.
What are the feature of Checkmarx?
Checkmarx is a robust application security testing (AST) solution with a range of features designed to identify and remediate security vulnerabilities in software applications. Below are the key features of Checkmarx, as well as insights into how it works and its typical architecture:
Features of Checkmarx:
- Static Application Security Testing (SAST): Checkmarx performs static analysis on source code and binaries to find security vulnerabilities, coding errors, and other issues early in the software development lifecycle.
- Interactive Application Security Testing (IAST): It offers IAST capabilities, providing real-time feedback on application security issues during runtime, helping developers identify and fix vulnerabilities as they occur.
- Dynamic Application Security Testing (DAST): Checkmarx supports DAST, which assesses running web applications to find vulnerabilities like cross-site scripting (XSS), SQL injection, and more.
- Software Composition Analysis (SCA): It scans open-source and third-party components to identify known vulnerabilities, licensing issues, and compliance concerns.
- Customizable Policies: Checkmarx allows organizations to define custom security policies and coding standards to align with their specific security requirements and compliance needs.
- Integration with CI/CD Pipelines: Checkmarx integrates seamlessly with continuous integration and continuous deployment (CI/CD) pipelines to automate code scans and vulnerability assessments as part of the development process.
- Remediation Guidance: It provides detailed guidance on remediating identified vulnerabilities, including code fix suggestions, enabling developers to address security issues efficiently.
- Compliance Reporting: Checkmarx generates compliance reports to demonstrate adherence to security standards and regulatory requirements, such as PCI DSS, HIPAA, and OWASP Top Ten.
- Security Training: It offers educational resources and training materials to educate developers and security teams about application security best practices and coding guidelines.
- Role-Based Access Control: Checkmarx allows organizations to set role-based access controls to ensure that only authorized personnel can access and modify scan results and configurations.
How Checkmarx works and Architecture?

Architecture:
Checkmarx’s architecture typically consists of the following components:
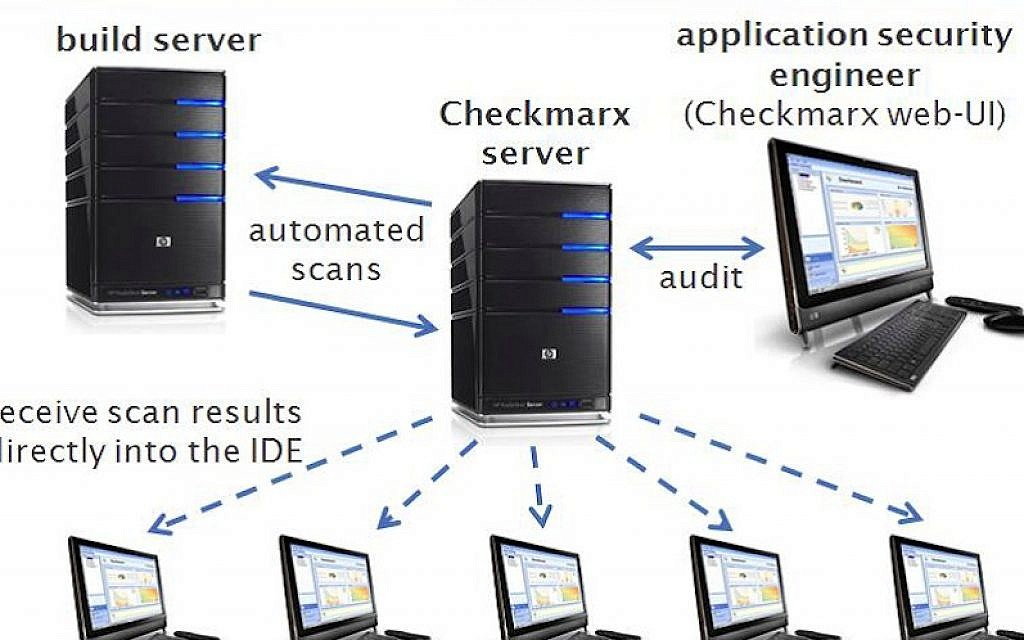
- Checkmarx Server: The Checkmarx Server is the core component responsible for managing scans, storing scan results, and providing access to the web-based user interface. It also handles integration with other tools and services.
- Checkmarx Agents: Agents are deployed in the development environment to facilitate code analysis. Depending on the type of analysis (SAST or IAST), agents may be used for static or dynamic code analysis during development and testing.
- Web-Based User Interface: The Checkmarx web-based interface allows users to configure scans, initiate scans, view scan results, and access reporting and remediation guidance.
Workflow:
The typical workflow of Checkmarx involves these steps:
- Configuration: Users configure scan policies, set up integrations, and specify the target application for scanning using the web-based user interface.
- Scanning: The Checkmarx Server initiates scans based on the configured policies. For SAST, it performs static code analysis, and for IAST, it monitors runtime behavior.
- Vulnerability Identification: Checkmarx identifies vulnerabilities, coding errors, and security issues in the application code and runtime behavior.
- Reporting: The results of the scan, including detailed vulnerability information, are made available through the user interface. Organizations can prioritize and plan remediation based on these findings.
- Remediation: Developers can use the remediation guidance provided by Checkmarx to fix identified vulnerabilities and coding errors.
- Continuous Scanning: Checkmarx can be integrated into CI/CD pipelines, ensuring that scans are run automatically as part of the development and deployment process to maintain a secure software development lifecycle.
Checkmarx’s architecture is designed to be scalable and efficient, making it suitable for organizations of varying sizes and complexities. It facilitates the early identification and mitigation of security vulnerabilities, helping organizations deliver secure software products.
How to Install Checkmarx?
To install Checkmarx, follow these steps:
- Download the Checkmarx installation package. You can download the package from the Checkmarx website.
- Extract the installation package. You will need to extract the installation package to a folder on your computer.
- Run the installation wizard. Double-click on the
CxSetup.exefile to run the installation wizard. - Accept the license agreement. Review the license agreement and click Accept to continue.
- Choose your installation options. You can choose to install all of the Checkmarx components, or you can select specific components to install.
- Complete the installation. Click Install to complete the installation process.
Once the installation is complete, you will need to configure Checkmarx. To do this, follow these steps:
- Start the Checkmarx console.
- Click Help > About Checkmarx.
- Click the Configure button.
- In the Configuration Wizard, enter your Checkmarx license key and click Next.
- Configure the other Checkmarx settings as needed.
- Click Finish to fulfill the configuration process.
Once Checkmarx is configured, you can start scanning your code for vulnerabilities. To do this, follow these steps:
- Create a new scan project.
- Select the source code that you want to scan.
- Click Scan.
Checkmarx will scan your code and generate a report of the vulnerabilities that it finds. You can then review the report and take steps to fix the vulnerabilities.
Some additional tips for installing Checkmarx:
- Make sure that you have enough disk space to install Checkmarx.
- Close any open applications before you start the installation process.
- If you are installing Checkmarx on a network, make sure that you have administrator privileges.
- If you are having trouble installing Checkmarx, consult the Checkmarx documentation or contact Checkmarx support.
Basic Tutorials of Checkmarx: Getting Started

The following are the step-by-step Basic Tutorials of Checkmarx:
Prerequisites:
- A Checkmarx account
- A source code repository
Tutorial:
- Create a new scan project.
- Log in to the Checkmarx web portal.
- Click the Projects tab.
- Click the New Project button.
- Enter a name for the project and select a preset.
- Click the Create button.
- Scan your code.
- Click the Scans tab.
- Click the New Scan button.
- Choose the project that you want to scan.
- Select the source code that you want to scan.
- Click the Scan button.
- Review scan results.
- Click the Scans tab.
- Click the name of the scan that you want to review.
- The scan results will be displayed in the Scan Results pane.
- You can review the results by vulnerability type, severity, and location in the source code.
- Fix vulnerabilities.
- Click the name of a vulnerability to view more information.
- The vulnerability description will include a recommendation for how to fix the vulnerability.
- Fix the vulnerability in your source code.
- Re-scan your code to verify that the vulnerability has been fixed.
Additional Tips:
- You can use Checkmarx to scan code in a variety of languages, including Java, C/C++, Python, and JavaScript.
- You can use Checkmarx to scan code from a variety of sources, including local files, git repositories, and CI/CD pipelines.
- Checkmarx provides a variety of reports that you can use to review scan results, including HTML reports, PDF reports, and CSV reports.
- You can also use Checkmarx to integrate with other security tools, such as Jira and Confluence.
A more detailed example of how to scan a Java project with Checkmarx:
- Create a new scan project.
- Log in to the Checkmarx web portal.
- Click the Projects tab.
- Click the New Project button.
- Type a name for the project, such as “My Java Scan”.
- Select the “Java” preset.
- Click the Create button.
- Scan your code.
- Click the Scans tab.
- Click the New Scan button.
- Select the project that you want to scan, such as “My Java Project Scan”.
- Select the source code that you want to scan. For a Java project, you can scan a local file, a git repository, or a CI/CD pipeline.
- Click the Scan button.
- Review scan results.
- Click the Scans tab.
- Click the name of the scan that you want to review, such as “My Java Project Scan”.
- The scan results will be displayed in the Scan Results pane.
- You can review the results by vulnerability type, severity, and location in the source code.
- Fix vulnerabilities.
- Click the name of a vulnerability to view more information.
- The vulnerability description will include a recommendation for how to fix the vulnerability.
- Fix the vulnerability in your source code.
- Re-scan your code to verify that the vulnerability has been fixed.
Once you have fixed all of the vulnerabilities in your code, you can be confident that your application is more secure.

👤 About the Author
Ashwani is passionate about DevOps, DevSecOps, SRE, MLOps, and AiOps, with a strong drive to simplify and scale modern IT operations. Through continuous learning and sharing, Ashwani helps organizations and engineers adopt best practices for automation, security, reliability, and AI-driven operations.
🌐 Connect & Follow:
- Website: WizBrand.com
- Facebook: facebook.com/DevOpsSchool
- X (Twitter): x.com/DevOpsSchools
- LinkedIn: linkedin.com/company/devopsschool
- YouTube: youtube.com/@TheDevOpsSchool
- Instagram: instagram.com/devopsschool
- Quora: devopsschool.quora.com
- Email– contact@devopsschool.com

