JupyterHub is an open-source, multi-user server designed to provide access to Jupyter Notebook environments for multiple users simultaneously. It’s particularly useful for organizations, educational institutions, and research teams that need to offer data science and computing resources to groups of users. JupyterHub allows users to run Jupyter Notebooks in a centralized, managed environment, eliminating the need for individual setups on local machines.
JupyterHub is the best way to serve Jupyter notebook for multiple users. Because JupyterHub manages a separate Jupyter environment for each user, it can be used in a class of students, a corporate data science group, or a scientific research group. It is a multi-user Hub that spawns, manages, and proxies multiple instances of the single-user Jupyter notebook server.
JupyterHub can be used in a collaborative environment by both small (0-100 users) and large teams (more than 100 users) such as a class of students, corporate data science group or scientific research group. It has two main distributions which are developed to serve the needs of each of these teams respectively.
- The Littlest JupyterHub distribution is suitable if you need a small number of users (1-100) and a single server with a simple environment.
- Zero to JupyterHub with Kubernetes allows you to deploy dynamic servers on the cloud if you need even more users. This distribution runs JupyterHub on top of Kubernetes.
Key Features of JupyterHub
- Multi-User Support:
- JupyterHub allows multiple users to access their own isolated Jupyter Notebook environments from a single server. Each user’s workspace remains independent and protected, allowing them to work without interference.
- Centralized Management:
- Administrators can manage, monitor, and maintain all user environments centrally. They control user access, storage limits, available resources, and more, streamlining the administrative tasks involved in managing data science environments for large groups.
- Authentication:
- JupyterHub supports multiple authentication methods, including username/password, LDAP, OAuth, GitHub, Google, and custom authentications. This flexibility makes it adaptable to a wide range of organizational needs and security requirements.
- Environment Customization:
- Admins can configure each user’s environment to include specific Python or R packages, libraries, and tools. This ensures all users have consistent environments, which is helpful for educational courses, research projects, or enterprise applications.
- Scalability and Integration with Kubernetes:
- JupyterHub can scale up to meet the needs of many users, especially when deployed with Kubernetes (known as Zero to JupyterHub with Kubernetes). Kubernetes provides container orchestration, allowing JupyterHub to manage many user instances dynamically based on resource demands.
- Resource Allocation and Monitoring:
- Administrators can allocate specific CPU, memory, and storage resources to each user, managing the server load effectively. This is especially valuable for organizations with limited resources or for managing high-demand computational workloads.
- Support for Different Spawning Options:
- JupyterHub supports launching user notebooks on various backend systems, including Docker containers, local servers, and remote clusters, providing flexibility based on infrastructure requirements.
Use Cases for JupyterHub
- Education:
- JupyterHub is widely used in academic institutions to provide students with a consistent environment for coursework, assignments, and labs without requiring individual setups on personal devices.
- Research Collaboration:
- Research teams can use JupyterHub to share data, code, and computational resources, allowing them to collaborate efficiently on data science and computational research projects.
- Enterprise Data Science Platforms:
- Many companies and organizations use JupyterHub to provide a shared environment for data science teams. It allows centralized data access, reproducibility, and secure handling of company data.
- Workshops and Training:
- JupyterHub is ideal for workshops and training sessions where participants need a consistent environment. It removes the need for installation and configuration on individual laptops, making it easier to focus on content.
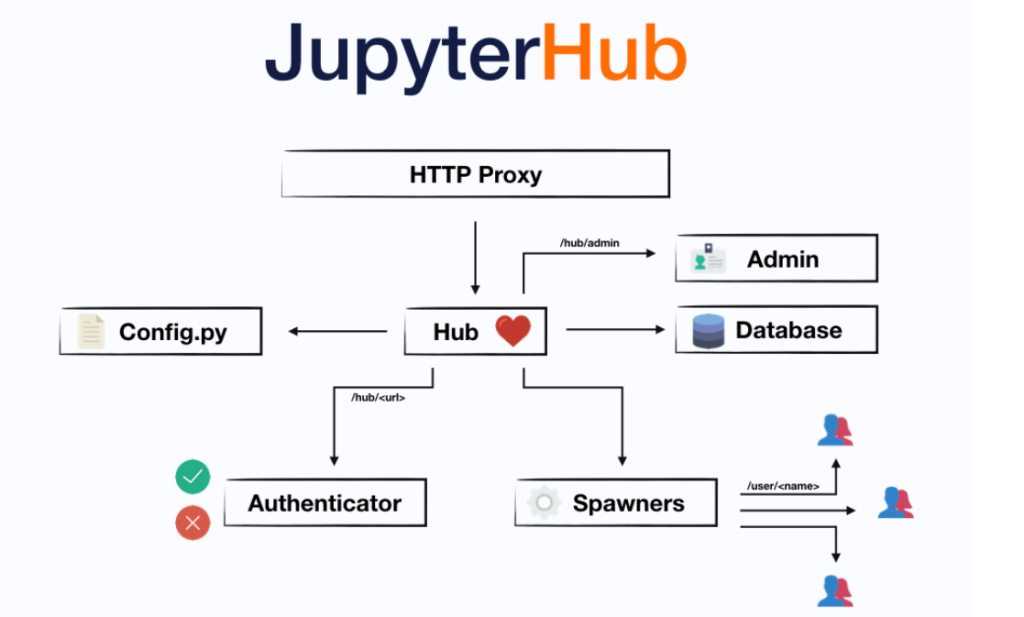
JupyterHub is made up of four subsystems:
- a Hub (tornado process) that is the heart of JupyterHub
- a configurable http proxy (node-http-proxy) that receives the requests from the client’s browser
- multiple single-user Jupyter notebook servers (Python/IPython/tornado) that are monitored by Spawners
- an authentication class that manages how users can access the system
How JupyterHub Works

- Hub:
- The main server that manages user sessions and authentication. It acts as a control center for JupyterHub.
- Proxy:
- JupyterHub uses a configurable HTTP proxy that routes requests to individual user environments, ensuring that each user has an isolated workspace.
- Spawners:
- Spawners are responsible for starting user notebook servers. Different spawner types support launching notebook instances on Docker, Kubernetes, local machines, or even cloud instances. The choice of spawner depends on infrastructure and scaling needs.
Getting Started with JupyterHub
To set up JupyterHub, you can follow these steps:
- Install JupyterHub using Conda or pip:
conda install -c conda-forge jupyterhuborpip install jupyterhub - Set up a Configuration File to define user environments, authentication settings, resource limits, and more. Run the following command to create a default configuration:
jupyterhub --generate-config - Start JupyterHub with the following command:
jupyterhub - Access JupyterHub through a web browser at
http://localhost:8000, where users can log in to their notebooks.
For larger deployments, consider using JupyterHub with Kubernetes for scalability and efficient resource management. JupyterHub simplifies access to Jupyter Notebooks in a collaborative environment and is widely used for education, research, and enterprise-level data science applications.
Reference
https://jupyterhub.readthedocs.io/en/stable
I’m a DevOps/SRE/DevSecOps/Cloud Expert passionate about sharing knowledge and experiences. I am working at Cotocus. I blog tech insights at DevOps School, travel stories at Holiday Landmark, stock market tips at Stocks Mantra, health and fitness guidance at My Medic Plus, product reviews at I reviewed , and SEO strategies at Wizbrand.
Do you want to learn Quantum Computing?
Please find my social handles as below;
Rajesh Kumar Personal Website
Rajesh Kumar at YOUTUBE
Rajesh Kumar at INSTAGRAM
Rajesh Kumar at X
Rajesh Kumar at FACEBOOK
Rajesh Kumar at LINKEDIN
Rajesh Kumar at PINTEREST
Rajesh Kumar at QUORA
Rajesh Kumar at WIZBRAND

